I recently bought a 1999 GMC Sierra 1500 LS to use for hauling and other odd jobs. It was a fleet vehicle for a pipeline company in the western US. It seems to have been well maintained mechanically, it runs nicely. It has quite a few bumps and bruises to the body and a few minor things that I'm working on to get it a bit better.
I just finished up replacing the door hinge pins and bushings and removing and cleaning the instrument cluster. I have taken pictures of these jobs and will shortly be publishing a write up about how I did it. Perhaps these can assist you in doing the same thing.
Monday, November 19, 2012
Saturday, April 14, 2012
Why I will no longer patronize Tiger Direct
I know, I know, this is supposed to be a car repair blog. But I figure since I get so many hits on it for car repair stuff, this post and my last one would do well here to get my message across.
In my last post "Biostar Sucks", I stated that I had put together a new computer for my Wife. Shortly after doing that, my computer started acting up. With my computer being nearly five years old and it acting up, I decided it was time to build a new one for me too.
I researched the components I wanted on several different sites. Tiger Direct came up a bit better than the place I normally use (Newegg). Tiger Direct's shipping is always slower that Newegg, but the price difference was worth it.
All of the stuff came within the designated shipping time and everything was in good shape. I don't like Mail in Rebates. However, Tiger Direct's process while tedious seems to be better than most. Their rebate center seems to be organized and fair. To be honest, I already received one of the rebates after only one month of waiting. The others are still "processing". I'm fairly confident that eventually I will get back all of the rebates I submitted. Time will tell.
All of this leads us to why I won't buy stuff from Tiger Direct any longer. A couple of weeks after getting the new computer together I received an email from them asking me to review all of the different components I purchased from them. I went on a short trip we had planned, but did the reviews when I returned. I was honest in my evaluations, so far everything I put in the new build is working well. The items I bought that had MIR's I commented that the MIR's were a pain in the neck with no guarantee that you would get your money back. Even though I think I will eventually get my money back, I believe a better way to get people to buy is to just discount the items up front. I know why they do this though, it's to save money. Most people won't go through the hassle of collecting all of the required documentation to get their rebates. They can advertise that this product is less because it has a rebate and entice someone to buy it, knowing full well that most people won't do what needs to be done to receive the money. Anyway, my comments were edited by Tiger Direct. All of the references to the MIR's in my comments were removed.
To make a long story short, any company that can't take constructive criticism along with praise has an integrity problem and does not deserve my patronage. I would recommend using other businesses for your electronics needs.
Monday, March 26, 2012
Biostar Sucks
I know, this is supposed to be a car repair blog. Well, I decided to stray from the norm for a bit to tell about my experience with Biostar.
Biostar is a company that makes electronic gear. I recently purchased a Motherboard made by Biostar for a computer I put together for my wife. I've used their stuff for years. I've had good luck with their products too. This time not so good.
Two issues have happened with this purchase. First, the computer I built has a habit of giving an error message when booting into the OS. When doing so, occasionally a message will pop up that says something like "xxxx failed to shut down properly". I changed out pretty much everything trying to locate the culprit and have come to the conclusion that it is the Motherboard.
The second issue I have with Biostar is that when I bought this Motherboard, it came with a Mail in Rebate offer. Not one to pass up free money, I followed their instructions to the "T" and submitted everything in a timely manner. It's been over 12 weeks now, and no rebate. They state that it should take no longer than 10 weeks to receive the rebate. I did some searching on the web about Biostar's practice with Mail in Rebates and found that they pretty much are crooks when it comes to honoring the Rebates.
While I believe that my first issue could happen to any Motherboard manufacturer, a history of ignoring, throwing away or losing, etc, Mail in Rebates is bad and dishonest business practice and goes to the integrity of the company doing it. It is for this reason that I will never buy another product from Biostar.
That's just my two cents on this subject.
Friday, February 24, 2012
My problem with Hyundai
Last year I bought a brand new Hyundai Sonata. Below is a letter I recently wrote to them explaining my problems. I sent it off around two weeks ago, still haven't heard anything from them, don't really expect to. I would suggest you look for another brand if you're considering purchasing a Hyundai.
To Whom it May Concern,
On July 1, 2011, I purchased a Hyundai Sonata from the dealership in XXXXX, CA. After a bit of negotiating, I was able to get it for what I believed to be a fair price.
I’m writing this letter to you to inform you why I’ve soured on Hyundai.
With the purchase of the vehicle, came a three month free trial of Sirius/XM radio. While I didn’t really care if it came with the car or not, my wife and I tried it out. We weren’t too impressed with the service. My interaction with the sales representatives from Sirius/XM was very frustrating and troublesome. They constantly harassed me at home by calling continually and bothering me. I finally took one of their calls and had to just hang up the phone on them, they were very pushy and in my opinion, rude. I know this has more to do with them than Hyundai, but your company is the one that decided to offer the three month free deal, so I hold you responsible.
Next came a couple of issues with the vehicle itself. While on a trip from my home in XXXXX, CA to San Antonio, TX, I discovered that my speedometer was off by what I consider to be a large margin, about 2.8% or right at 40 miles in a 1340 mile one way trip. While on this trip, we also got several warnings from the TPMS. We had to stop several times to make sure we weren’t running on flat tires.
When we got home from this trip (we put on over 3000 miles), I brought the car in for it’s 7500 mile service. I notified the Service Department of the issues and they told me they would check it out. When the vehicle service was completed, I was told that nothing was going to be done about the speedometer since it was “within” specs. According to the service manager, the engineers who figure all of that stuff out decided that the inaccuracy of the speedometer was acceptable to them. I was also told that there was a wide spread problem with the TPMS on these cars and it might be to my advantage just to take the bulb out of the warning light.
The 2.8% inaccuracy in my speedometer is not acceptable to me. Telling me to just take the bulb out of the dash to fix my TPMS problems is not acceptable either. It is hard for me to believe in this day and age that a vehicle speedometer could be that far off right from the factory and you can’t get the TPMS to operate properly.
If in fact the problem with my speedometer is acceptable to Hyundai, if makes me wonder what else is going to be inaccurate or troublesome in the future and be acceptable to the company?
A couple of other issues that come to mind. I always take good care of my vehicles. I try my best to get them in for service in a timely manner. I am doing this with the Sonata. On my last oil change, I was promised a free car wash. I called and made an appointment to have the oil changed. Brought it in on time, and was told that the person who does the car washes was not there due to being out delivering parts. Now, they told me I could wait, but when I asked, they said they didn’t know when he would return. My time is worth something too. I’m not going to wait around with no idea when I might get the car washed. One last thing, every time I’ve brought the vehicle in for maintenance, they do a check of the tire pressures. Every time I’ve brought the vehicle home, the tire pressures have been no where near the recommended pressures in the owners manual or printed on the drivers door “B” pillar. This last time, I had the front left tire over inflated by 15 psi. Apparently attention to detail is not common at this dealership service department.
When I purchased the vehicle, I gave my word to the Sales Manager that I would bring in my car there for service for at least a year because they were giving me such a “great deal”. My word is my bond. I planned on doing what I told him, but since they aren’t living up to their side of the deal, I don’t think I need to live up to my side any longer either.
I’m sure you can tell that I’m not a happy camper. It is funny that a company that touts it’s vehicles so much refuses to stand behind them.
Thursday, February 2, 2012
Instrument Cluster removal on an E34 BMW
This will probably be my last post concerning the two E34 BMW's I've owned and written about here. My Mom just turned 86 recently and decided that she doesn't want to drive any longer. She had a ten year old car that only had 26K miles on it that was in really good shape. She gave it to me, hence I no longer need the 95 525i that I've owned for the past four years.
The 95 BMW's registration was up for renewal, so I needed to get it smogged. These old BMW's can put you through the wringer when you try to smog them. I did what I had to do last time I smogged this car, new air filter, new plugs and fresh oil change. Took it down to the Smog Test place after driving it hard on the freeway for about 30 minutes to get it nice and warm. The Smog guy got to it in about 10 minutes, but it failed. Didn't know it at the time, but the "Check Engine" light was not working. In California, that is an automatic fail even if you pass the rest of the test, which I didn't.
On my way home from the Smog Test, I decided to just get rid of the car. I had a much nicer, newer vehicle to use and really didn't care what I could get for it. I called around to some local wrecking yards and got someone to give me $500 sight unseen. This was on a Friday afternoon. I then started thinking about this buddy of mine who enjoys working on cars and is quite a good mechanic. I talked to him at Church on Sunday and he said he would buy it for $500.
He picked up the car this morning.
Before I handed it off to him, I decided to go ahead and at least change out the bulb for the "Check Engine" light. I figured while I was in there that I might as well replace the Gear Shift indicator light in the dash that burned out a while ago. I had some of the bulbs for the dash for over a year.
So, this post is mainly to give you some extra photos to look at above and beyond what the Bentley manual shows (their photos aren't always the best quality).
If you came here looking for a complete "how to" on how to remove your cluster, you won't find it here. The Bentley manual has excellent instructions on how to do this. I'm just enhancing the procedure a bit with some color pictures that are clearer. If you don't have a Bentley manual, I would suggest buying one.
If you look in the Bentley manual under Instrument cluster, removing and installing (Section 620-2) it gives you the step by step for removing it.
To remove the cluster, you have to remove the drivers air bag and the steering wheel. The air bag removal instructions are in section 721 and the steering removal instructions are in section 320 of the Bentley.
Just make sure you disconnect the battery before you attempt any of this.
These pictures added below should help you during the process:
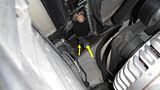
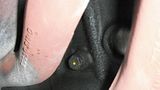
Once you have the battery disconnected, you need to remove the air bag. You need to unplug the connector under the steering wheel column to do that. The picture in the Bentley isn't real clear. In this picture, the yellow arrow points to that connector. It has orange on it as stated in the manual. I took the air bag out of the 93 525i I had and the plug seemed to be a bit different that the 95 525i. As long as it had ORANGE on it, that will be the right plug. If you remove the plug denoted in the picture with the green arrow before the air bag plug it makes the entire process easier.
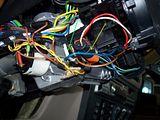
Once you have those plugs disconnected, you are ready to remove the air bag. Just follow the instructions in the Bentley. My air bag used the T27 Torx to remove it.
Once the air bag is free from the steering wheel, you need to remove the plugs attaching it to the steering wheel. It's fairly simple to figure out what you need to do at this point.
With the air bag completely removed from the steering wheel, you can remove the steering wheel. Again follow the instructions in the Bentley.
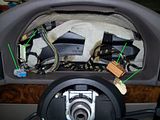
With the steering wheel gone, the cluster comes out fairly easy. Follow the instructions to get the cluster out. Make sure that you cover the steering column with a towel or thick rag. I did, but didn't secure it as well as I should have and it fell off. While I was working on the cluster, with the towel gone, I ended up scratching the bezel to the cluster.
This next series of pictures show the cluster coming out.
This one shows the cluster still attached to the cables. The four green lines show the location of the plugs that plug into the back of the cluster:
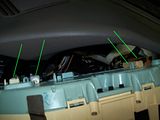
This picture shows the cluster removed and the four cables that were plugged into the cluster (see green lines):
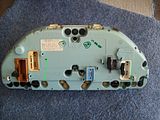
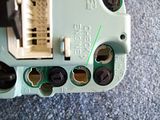
This pic shows the cluster out of the car. The picture is the back of the cluster. If you look at the plug sockets, you can see a small black lever to the left of each plug except for the second from the left. Those levers release the plug from the socket. This car is 17 years old and those levers are made of plastic. I tried my best to gently manipulate those levers, all but the one worked fine, the other one broke even though I was trying to do it as gently as possible.
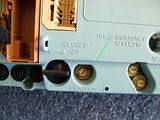
These last two pictures show the location of the bulbs that I needed to replace. The first one is the "Check Engine" light, as you can see, there was no bulb there, that's why it wasn't working. The second pic is where the Gear Shift indicator light bulb is located.
Installation is reverse of removal. Just remember that you need to plug in those two plugs under the steering wheel. If you have any questions, leave me a comment or email me. Good Luck!
The 95 BMW's registration was up for renewal, so I needed to get it smogged. These old BMW's can put you through the wringer when you try to smog them. I did what I had to do last time I smogged this car, new air filter, new plugs and fresh oil change. Took it down to the Smog Test place after driving it hard on the freeway for about 30 minutes to get it nice and warm. The Smog guy got to it in about 10 minutes, but it failed. Didn't know it at the time, but the "Check Engine" light was not working. In California, that is an automatic fail even if you pass the rest of the test, which I didn't.
On my way home from the Smog Test, I decided to just get rid of the car. I had a much nicer, newer vehicle to use and really didn't care what I could get for it. I called around to some local wrecking yards and got someone to give me $500 sight unseen. This was on a Friday afternoon. I then started thinking about this buddy of mine who enjoys working on cars and is quite a good mechanic. I talked to him at Church on Sunday and he said he would buy it for $500.
He picked up the car this morning.
Before I handed it off to him, I decided to go ahead and at least change out the bulb for the "Check Engine" light. I figured while I was in there that I might as well replace the Gear Shift indicator light in the dash that burned out a while ago. I had some of the bulbs for the dash for over a year.
So, this post is mainly to give you some extra photos to look at above and beyond what the Bentley manual shows (their photos aren't always the best quality).
If you came here looking for a complete "how to" on how to remove your cluster, you won't find it here. The Bentley manual has excellent instructions on how to do this. I'm just enhancing the procedure a bit with some color pictures that are clearer. If you don't have a Bentley manual, I would suggest buying one.
If you look in the Bentley manual under Instrument cluster, removing and installing (Section 620-2) it gives you the step by step for removing it.
To remove the cluster, you have to remove the drivers air bag and the steering wheel. The air bag removal instructions are in section 721 and the steering removal instructions are in section 320 of the Bentley.
Just make sure you disconnect the battery before you attempt any of this.
These pictures added below should help you during the process:
Once you have the battery disconnected, you need to remove the air bag. You need to unplug the connector under the steering wheel column to do that. The picture in the Bentley isn't real clear. In this picture, the yellow arrow points to that connector. It has orange on it as stated in the manual. I took the air bag out of the 93 525i I had and the plug seemed to be a bit different that the 95 525i. As long as it had ORANGE on it, that will be the right plug. If you remove the plug denoted in the picture with the green arrow before the air bag plug it makes the entire process easier.

Once you have those plugs disconnected, you are ready to remove the air bag. Just follow the instructions in the Bentley. My air bag used the T27 Torx to remove it.
Once the air bag is free from the steering wheel, you need to remove the plugs attaching it to the steering wheel. It's fairly simple to figure out what you need to do at this point.
With the air bag completely removed from the steering wheel, you can remove the steering wheel. Again follow the instructions in the Bentley.
With the steering wheel gone, the cluster comes out fairly easy. Follow the instructions to get the cluster out. Make sure that you cover the steering column with a towel or thick rag. I did, but didn't secure it as well as I should have and it fell off. While I was working on the cluster, with the towel gone, I ended up scratching the bezel to the cluster.
This next series of pictures show the cluster coming out.
This one shows the cluster still attached to the cables. The four green lines show the location of the plugs that plug into the back of the cluster:

This picture shows the cluster removed and the four cables that were plugged into the cluster (see green lines):

This pic shows the cluster out of the car. The picture is the back of the cluster. If you look at the plug sockets, you can see a small black lever to the left of each plug except for the second from the left. Those levers release the plug from the socket. This car is 17 years old and those levers are made of plastic. I tried my best to gently manipulate those levers, all but the one worked fine, the other one broke even though I was trying to do it as gently as possible.

These last two pictures show the location of the bulbs that I needed to replace. The first one is the "Check Engine" light, as you can see, there was no bulb there, that's why it wasn't working. The second pic is where the Gear Shift indicator light bulb is located.


Installation is reverse of removal. Just remember that you need to plug in those two plugs under the steering wheel. If you have any questions, leave me a comment or email me. Good Luck!
Wednesday, July 20, 2011
Good Bye to a Friend---
I just recently retired from my long time career as a Firefighter. With retirement came the opportunity to travel a bit more and see more of this beautiful country that we live in.
With the traveling came a desire to get a bit more reliable vehicle for the longer trips we would be taking. So it was with a bit of regret that I had to let the 93 BMW 525i go that I had been driving back and forth to work for over 18 months. Even though it had been about one step from the junk yard when I bought it, it served me well after I spent a lot of time and money on it to get it in decent shape. I was happy to have had it for the time I used it. It was a bit frustrating getting it fixed up, but fun at the same time. I learned a lot about E34 BMW's and myself while working on that car.
I know a guy who is a very good mechanic, that was looking for a vehicle for his family. I ended up giving it to him. The thing that made up my mind for me was the transmission threw a TRANS PROG+ code one day as I was doing some errands. I didn't want to sell it in that condition and didn't want to spend a bunch of money getting the transmission fixed. I offered it to my friend who jumped at the chance and he is now trying to figure out what is wrong with it exactly. Doesn't appear that the transmission is completely gone, may just be a bad sensor. Hope he gets it running and can keep it going.
So, I still have the 95 BMW 525i left that I did the Head rebuild on a couple of years ago. May be getting rid of that one too in the not too distant future. Anyone out there looking for a decent car for a fair price, hit me up, maybe we can make a deal.
Monday, October 4, 2010
Thermostat and Water Pump replacement on a 93 BMW 525i
I try and stay away from making posts about stuff that you can readily find in the Bentley manual. The information in the Bentley concerning the Thermostat and Water Pump are very adequate and if you follow that information you will be able to complete these jobs with no problem.
What I thought that I'd do in this post is give a few tips I've discovered while doing these jobs four different times now.
The reason I did the replacement of the thermostat and water pump so soon is because I developed a leak. Actually it was leaking for a good year or so, but only occasionally. Once in a while I'd notice some coolant on the ground, I couldn't tell where it was coming from exactly, but I knew it was from the front of the engine, so more than likely it was the water pump. I like to change out the thermostat when I do a water pump since I've got everything apart anyway, so I ordered the things I needed. I got a new water pump, thermostat and housing, radiator hoses and belts. I could tell the belts were getting wet from the leak and figured it would be a good idea to change them out too.
Here are some tips that should make your job a bit easier if you have the Bentley and follow it.
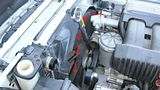
To get to the water pump and thermostat, you need to remove the fan and housing. They say you need a special tool to hold the fan pulley, but you don't really need it. I used a 1 1/4" open end wrench to loosen the fan nut. Remember, it is a left hand thread, so you turn it the opposite way to loosen it. Here is the tip you can use to get it loose without the special tool. If you look at the picture below, you can see where I've drawn the arrows. Take a mallet, I used a rubber one and hit it in the direction shown. It probably won't break loose the first time, maybe not even the 10th time, but it will eventually break loose. I started using a propane torch to heat up the fan nut so it would break loose easier. If it won't come loose without it, try the heat.
This pic shows the location of the fan nut without the wrench:
This pic shows with the wrench:
With the fan and housing removed, you can now proceed. Before you attempt to remove the thermostat housing or water pump, you need to drain the coolant out of the system.
Here are a couple of tips that might help.
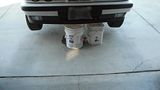
First off, I jack up the front end of the car and put two buckets under the radiator, see pic:
Make sure all of your heater settings in the car are set to HOT, best way to do this is to turn on the key, turn the knobs and wait for about 30 seconds and then turn off the key. Then I open the radiator drain. I completely remove the drain plug and to do that, you have to remove the retaining pin (see pic, you may not have the retaining pin, one of my 525i's was missing it the first time I did this). It drains much faster without the plug in the hole.
Make sure you remove the radiator cap too so the coolant will drain quicker.
Once the radiator is drained, you still need to drain the rest of the coolant in the block.
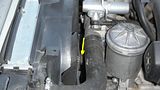
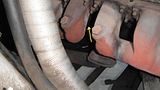
You do this by removing the block plug. The block plug is located on the passenger side of the motor right between the exhaust headers. Depending on how much of the original shielding you have underneath your car you may have to remove several panels to let the coolant drain properly. Both my cars had only a couple of pieces of the shielding up, so it came apart easily.
This series of pics shows the location on the block plug:
Once the coolant is drained, you can finally get down to business.
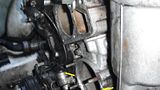
This picture shows several different things. The location of the thermostat housing and it's bolts (red arrow housing, dots are bolt locations). Yellow arrow shows threads of water pump where fan attaches to, yellow dots show bolts that hold fan pulley to the water pump. White arrows show locations of the tensioner pulley's for the belts. You will use one of a few different things to remove the belts, either an allen wrench, torx wrench or socket wrench. Just depends on how your car is set up.

Once you have the belts and radiator hoses removed, you can work on taking the thermostat housing and water pump out. Thermostat housing is easy, just remove the four bolts. The water pump can be a bit more challenging, but not that bad. If you look in the Bentley, it tells you that you need two M6 bolts to draw the water pump out of it's seat once you have removed the four mounting nuts. I looked high and low for those M6 bolts the first time I did this job. I went to the local BMW Dealer and even they didn't really know what I was talking about, but I finally ended up with what I needed. To make your job easier, the three small bolts that hold the thermostat housing on are M6 bolts and work perfectly for drawing out the water pump. You just thread them into the ears on either side of the water pump and slowly turn them a little at a time and it will draw the pump out. One of my cars didn't even need to have that done, the pump pulled out easily by hand.
If you look at the picture below, you can barely see where the M6 bolts push against to draw the pump out, I didn't take a picture of the pump installed, this is after I had already removed the pump. You can also see above where the thermostat and housing fit.
Once you get to this point, the Bentley does a very good job of instructing you on what to do. It's pretty much just reverse of the removal to install. Make sure you use BMW coolant and distilled water, not the green stuff to refill the system. All of the torque specs are listed in the Bentley and should be followed. Other than that, good luck with your project.
What I thought that I'd do in this post is give a few tips I've discovered while doing these jobs four different times now.
The reason I did the replacement of the thermostat and water pump so soon is because I developed a leak. Actually it was leaking for a good year or so, but only occasionally. Once in a while I'd notice some coolant on the ground, I couldn't tell where it was coming from exactly, but I knew it was from the front of the engine, so more than likely it was the water pump. I like to change out the thermostat when I do a water pump since I've got everything apart anyway, so I ordered the things I needed. I got a new water pump, thermostat and housing, radiator hoses and belts. I could tell the belts were getting wet from the leak and figured it would be a good idea to change them out too.
Here are some tips that should make your job a bit easier if you have the Bentley and follow it.
To get to the water pump and thermostat, you need to remove the fan and housing. They say you need a special tool to hold the fan pulley, but you don't really need it. I used a 1 1/4" open end wrench to loosen the fan nut. Remember, it is a left hand thread, so you turn it the opposite way to loosen it. Here is the tip you can use to get it loose without the special tool. If you look at the picture below, you can see where I've drawn the arrows. Take a mallet, I used a rubber one and hit it in the direction shown. It probably won't break loose the first time, maybe not even the 10th time, but it will eventually break loose. I started using a propane torch to heat up the fan nut so it would break loose easier. If it won't come loose without it, try the heat.
This pic shows the location of the fan nut without the wrench:

This pic shows with the wrench:

With the fan and housing removed, you can now proceed. Before you attempt to remove the thermostat housing or water pump, you need to drain the coolant out of the system.
Here are a couple of tips that might help.
First off, I jack up the front end of the car and put two buckets under the radiator, see pic:

Make sure all of your heater settings in the car are set to HOT, best way to do this is to turn on the key, turn the knobs and wait for about 30 seconds and then turn off the key. Then I open the radiator drain. I completely remove the drain plug and to do that, you have to remove the retaining pin (see pic, you may not have the retaining pin, one of my 525i's was missing it the first time I did this). It drains much faster without the plug in the hole.

Make sure you remove the radiator cap too so the coolant will drain quicker.
Once the radiator is drained, you still need to drain the rest of the coolant in the block.
You do this by removing the block plug. The block plug is located on the passenger side of the motor right between the exhaust headers. Depending on how much of the original shielding you have underneath your car you may have to remove several panels to let the coolant drain properly. Both my cars had only a couple of pieces of the shielding up, so it came apart easily.
This series of pics shows the location on the block plug:


Once the coolant is drained, you can finally get down to business.
This picture shows several different things. The location of the thermostat housing and it's bolts (red arrow housing, dots are bolt locations). Yellow arrow shows threads of water pump where fan attaches to, yellow dots show bolts that hold fan pulley to the water pump. White arrows show locations of the tensioner pulley's for the belts. You will use one of a few different things to remove the belts, either an allen wrench, torx wrench or socket wrench. Just depends on how your car is set up.

Once you have the belts and radiator hoses removed, you can work on taking the thermostat housing and water pump out. Thermostat housing is easy, just remove the four bolts. The water pump can be a bit more challenging, but not that bad. If you look in the Bentley, it tells you that you need two M6 bolts to draw the water pump out of it's seat once you have removed the four mounting nuts. I looked high and low for those M6 bolts the first time I did this job. I went to the local BMW Dealer and even they didn't really know what I was talking about, but I finally ended up with what I needed. To make your job easier, the three small bolts that hold the thermostat housing on are M6 bolts and work perfectly for drawing out the water pump. You just thread them into the ears on either side of the water pump and slowly turn them a little at a time and it will draw the pump out. One of my cars didn't even need to have that done, the pump pulled out easily by hand.
If you look at the picture below, you can barely see where the M6 bolts push against to draw the pump out, I didn't take a picture of the pump installed, this is after I had already removed the pump. You can also see above where the thermostat and housing fit.

Once you get to this point, the Bentley does a very good job of instructing you on what to do. It's pretty much just reverse of the removal to install. Make sure you use BMW coolant and distilled water, not the green stuff to refill the system. All of the torque specs are listed in the Bentley and should be followed. Other than that, good luck with your project.
Subscribe to:
Posts (Atom)