This will probably be my last post concerning the two E34 BMW's I've owned and written about here. My Mom just turned 86 recently and decided that she doesn't want to drive any longer. She had a ten year old car that only had 26K miles on it that was in really good shape. She gave it to me, hence I no longer need the 95 525i that I've owned for the past four years.
The 95 BMW's registration was up for renewal, so I needed to get it smogged. These old BMW's can put you through the wringer when you try to smog them. I did what I had to do last time I smogged this car, new air filter, new plugs and fresh oil change. Took it down to the Smog Test place after driving it hard on the freeway for about 30 minutes to get it nice and warm. The Smog guy got to it in about 10 minutes, but it failed. Didn't know it at the time, but the "Check Engine" light was not working. In California, that is an automatic fail even if you pass the rest of the test, which I didn't.
On my way home from the Smog Test, I decided to just get rid of the car. I had a much nicer, newer vehicle to use and really didn't care what I could get for it. I called around to some local wrecking yards and got someone to give me $500 sight unseen. This was on a Friday afternoon. I then started thinking about this buddy of mine who enjoys working on cars and is quite a good mechanic. I talked to him at Church on Sunday and he said he would buy it for $500.
He picked up the car this morning.
Before I handed it off to him, I decided to go ahead and at least change out the bulb for the "Check Engine" light. I figured while I was in there that I might as well replace the Gear Shift indicator light in the dash that burned out a while ago. I had some of the bulbs for the dash for over a year.
So, this post is mainly to give you some extra photos to look at above and beyond what the Bentley manual shows (their photos aren't always the best quality).
If you came here looking for a complete "how to" on how to remove your cluster, you won't find it here. The Bentley manual has excellent instructions on how to do this. I'm just enhancing the procedure a bit with some color pictures that are clearer. If you don't have a Bentley manual, I would suggest buying one.
If you look in the Bentley manual under Instrument cluster, removing and installing (Section 620-2) it gives you the step by step for removing it.
To remove the cluster, you have to remove the drivers air bag and the steering wheel. The air bag removal instructions are in section 721 and the steering removal instructions are in section 320 of the Bentley.
Just make sure you disconnect the battery before you attempt any of this.
These pictures added below should help you during the process:
Once you have the battery disconnected, you need to remove the air bag. You need to unplug the connector under the steering wheel column to do that. The picture in the Bentley isn't real clear. In this picture, the yellow arrow points to that connector. It has orange on it as stated in the manual. I took the air bag out of the 93 525i I had and the plug seemed to be a bit different that the 95 525i. As long as it had ORANGE on it, that will be the right plug. If you remove the plug denoted in the picture with the green arrow before the air bag plug it makes the entire process easier.
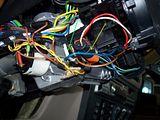
Once you have those plugs disconnected, you are ready to remove the air bag. Just follow the instructions in the Bentley. My air bag used the T27 Torx to remove it.
Once the air bag is free from the steering wheel, you need to remove the plugs attaching it to the steering wheel. It's fairly simple to figure out what you need to do at this point.
With the air bag completely removed from the steering wheel, you can remove the steering wheel. Again follow the instructions in the Bentley.
With the steering wheel gone, the cluster comes out fairly easy. Follow the instructions to get the cluster out. Make sure that you cover the steering column with a towel or thick rag. I did, but didn't secure it as well as I should have and it fell off. While I was working on the cluster, with the towel gone, I ended up scratching the bezel to the cluster.
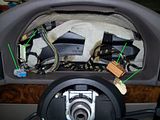
This next series of pictures show the cluster coming out.
This one shows the cluster still attached to the cables. The four green lines show the location of the plugs that plug into the back of the cluster:
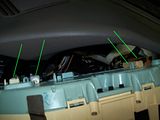
This picture shows the cluster removed and the four cables that were plugged into the cluster (see green lines):
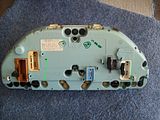
This pic shows the cluster out of the car. The picture is the back of the cluster. If you look at the plug sockets, you can see a small black lever to the left of each plug except for the second from the left. Those levers release the plug from the socket. This car is 17 years old and those levers are made of plastic. I tried my best to gently manipulate those levers, all but the one worked fine, the other one broke even though I was trying to do it as gently as possible.
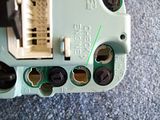
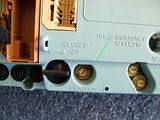
These last two pictures show the location of the bulbs that I needed to replace. The first one is the "Check Engine" light, as you can see, there was no bulb there, that's why it wasn't working. The second pic is where the Gear Shift indicator light bulb is located.
Installation is reverse of removal. Just remember that you need to plug in those two plugs under the steering wheel. If you have any questions, leave me a comment or email me. Good Luck!
The 95 BMW's registration was up for renewal, so I needed to get it smogged. These old BMW's can put you through the wringer when you try to smog them. I did what I had to do last time I smogged this car, new air filter, new plugs and fresh oil change. Took it down to the Smog Test place after driving it hard on the freeway for about 30 minutes to get it nice and warm. The Smog guy got to it in about 10 minutes, but it failed. Didn't know it at the time, but the "Check Engine" light was not working. In California, that is an automatic fail even if you pass the rest of the test, which I didn't.
On my way home from the Smog Test, I decided to just get rid of the car. I had a much nicer, newer vehicle to use and really didn't care what I could get for it. I called around to some local wrecking yards and got someone to give me $500 sight unseen. This was on a Friday afternoon. I then started thinking about this buddy of mine who enjoys working on cars and is quite a good mechanic. I talked to him at Church on Sunday and he said he would buy it for $500.
He picked up the car this morning.
Before I handed it off to him, I decided to go ahead and at least change out the bulb for the "Check Engine" light. I figured while I was in there that I might as well replace the Gear Shift indicator light in the dash that burned out a while ago. I had some of the bulbs for the dash for over a year.
So, this post is mainly to give you some extra photos to look at above and beyond what the Bentley manual shows (their photos aren't always the best quality).
If you came here looking for a complete "how to" on how to remove your cluster, you won't find it here. The Bentley manual has excellent instructions on how to do this. I'm just enhancing the procedure a bit with some color pictures that are clearer. If you don't have a Bentley manual, I would suggest buying one.
If you look in the Bentley manual under Instrument cluster, removing and installing (Section 620-2) it gives you the step by step for removing it.
To remove the cluster, you have to remove the drivers air bag and the steering wheel. The air bag removal instructions are in section 721 and the steering removal instructions are in section 320 of the Bentley.
Just make sure you disconnect the battery before you attempt any of this.
These pictures added below should help you during the process:
Once you have the battery disconnected, you need to remove the air bag. You need to unplug the connector under the steering wheel column to do that. The picture in the Bentley isn't real clear. In this picture, the yellow arrow points to that connector. It has orange on it as stated in the manual. I took the air bag out of the 93 525i I had and the plug seemed to be a bit different that the 95 525i. As long as it had ORANGE on it, that will be the right plug. If you remove the plug denoted in the picture with the green arrow before the air bag plug it makes the entire process easier.

Once you have those plugs disconnected, you are ready to remove the air bag. Just follow the instructions in the Bentley. My air bag used the T27 Torx to remove it.
Once the air bag is free from the steering wheel, you need to remove the plugs attaching it to the steering wheel. It's fairly simple to figure out what you need to do at this point.
With the air bag completely removed from the steering wheel, you can remove the steering wheel. Again follow the instructions in the Bentley.
With the steering wheel gone, the cluster comes out fairly easy. Follow the instructions to get the cluster out. Make sure that you cover the steering column with a towel or thick rag. I did, but didn't secure it as well as I should have and it fell off. While I was working on the cluster, with the towel gone, I ended up scratching the bezel to the cluster.
This next series of pictures show the cluster coming out.
This one shows the cluster still attached to the cables. The four green lines show the location of the plugs that plug into the back of the cluster:

This picture shows the cluster removed and the four cables that were plugged into the cluster (see green lines):

This pic shows the cluster out of the car. The picture is the back of the cluster. If you look at the plug sockets, you can see a small black lever to the left of each plug except for the second from the left. Those levers release the plug from the socket. This car is 17 years old and those levers are made of plastic. I tried my best to gently manipulate those levers, all but the one worked fine, the other one broke even though I was trying to do it as gently as possible.

These last two pictures show the location of the bulbs that I needed to replace. The first one is the "Check Engine" light, as you can see, there was no bulb there, that's why it wasn't working. The second pic is where the Gear Shift indicator light bulb is located.


Installation is reverse of removal. Just remember that you need to plug in those two plugs under the steering wheel. If you have any questions, leave me a comment or email me. Good Luck!
No comments:
Post a Comment