Saturday, April 8, 2017
99 GMC Sierra... oil leaks, intake manifold, knock sensors, valve covers and other miscellaneous things
Not too long ago, I finally had some free time to work on the old beater truck I bought about four years ago. It's had an oil leak that's been there since I bought it. Not a bad one, just a drip or two after I had driven it. After a while, those drips turn into a big mess on the garage floor. While trying to figure out exactly what could be causing the leak, I discovered that it could be one thing or several different things. I made up a plan of action, ordered the parts I'd need and when everything arrived, I got started. I decided to film parts of it so I could let you in on what I was doing. The video is around 20 minutes, I hope it helps if you're experiencing anything similar.
Wednesday, July 30, 2014
Replacing the radiator in my 1999 GMC Sierra 1500
I've been working on the old GMC truck I bought nearly two years ago. Right after I purchased it, I did a few repairs/fixes, a couple of which I wrote about on this blog.
About three months ago, I knew that this vehicle was going to be due for a California Smog Check by the end of August this year. I started working on it to help it be ready for the check. Once I got all of that done (it passed the Smog check easily), I started thinking about doing some maintenance on the truck that I wasn't sure had been done. So, the first thing I thought about was the coolant. I had no idea when the last time it had been changed out. I read up on it a bit and discovered that there should be DexCool in the system, which is orange in color. The coolant that was in truck was green. Green shouldn't be in there, so I decided to change it out.
So, for the first time on my blog, I'm doing a video post, instead of my typical written post with pictures. I shot it with my new video camera in HD (720p). I spent several hours putting together the video I shot. Please be kind if you have to make comments. I know that I made some mistakes in the video, called things the wrong names, but I think for the most part it will help you to understand the steps needed to replace your radiator if needed. In the video I explain why I ended up needing a new radiator. Hope you enjoy it!
If you want to watch it on YouTube, I think all you have to do is click on the YouTube link at the bottom of the video.
Tuesday, May 20, 2014
Don't buy from Parts Geek!!!
... Unless you want to get ripped off.
Just had a terrible experience with Parts Geek online auto parts store. I'm putting together a more in depth post, but couldn't wait to get a warning out to those who read this blog.
I should have the review of them taking advantage of me done in the next few days.
Here is one site I found a bit too late, if I had checked more diligently, I would not be in the situation I'm in now:
Link to site
Thursday, February 13, 2014
More on the 2014 Mazda CX-5
Shortly after filling up on the last tank of fuel, I was pulling out of my garage and the low oil pressure warning light came on. First time that I had seen that. Once I was out of the garage, I put the car in neutral and revved the motor a bit and the light went off. I drove to my destination, about a 60 mile drive, without the light coming back on.
After taking care of my business, I came back to the CX-5 about six hours later. Started it up and it did the same thing.
Over the next few days, it was hit or miss if the light came on. About the fifth day, my wife and I had taken a trip and were returning home. The light came on after starting the CX-5 and stayed on much longer. While parked, I played with the throttle to see when it would come on and go off. It seemed to come on under 1500 RPM and go off above 2000 RPM. It did this for several minutes until the motor got up to normal operating temperature (when the blue thermometer light on the dash goes off). We drove home. I had not seen the low oil pressure light come on while driving at freeway speeds at all, until this time. We were driving at 75 MPH at about 3000 RPM when the light came on and stayed on for about 3 to 5 seconds. It then went off and stayed off until we got off the freeway. When we came to the first traffic light after getting off the freeway, I put the CX-5 in neutral. The idle then started hunting up and down between about 500 RPM and 1000 RPM. It did this until I put the CX-5 back into gear.
So, when we got home I called the dealership where I bought the CX-5 and made an appointment to have it looked at. I couldn't get in for two days.
The next morning I went out and started the CX-5. It did what it had done the previous day, light on under 1500 RPM light off above 2000 RPM. When it got to normal operating temperature the light did not come back on. A few hours later, I went out and started it again. This time no low oil pressure light whatsoever. I did it again about six hours later, no light. Again the next morning, no light. It has not come on again over the past week.
Since I couldn't get the light to come on at all, I knew it would be pointless to bring it in to the shop to have it looked at. I cancelled my appointment.
I'm sure there are a few possibilities on what happened. My thinking now is that it either has a sensor that is only working intermittently, or that there was a small piece of debris or dirt in an oil line causing the low pressure light to come on. The piece of crud may have been flushed out and is no longer blocking the line. But those are just guesses on my part. I will continue to monitor the warning lights to see if anything else happens.
Still haven't dealt with the other stuff I wrote about in my first post about the CX-5. They are not critical issues (yet), and I would prefer not to go to the dealer until the CX-5 needs it's first oil change. That should not be for a couple of more months at the earliest.
Tuesday, January 28, 2014
2014 Mazda CX-5 Touring
A little over two weeks ago, we traded in our 2011 Hyundai Sonata on a brand new 2014 Mazda CX-5 Touring model.
I wrote a bit about some of the issues we had with the Sonata, but after owning it for just about 2 1/2 years I actually was able to get past those minor issues and come to like the vehicle. The main reason we got rid of it is my wife and I really like sitting higher in a vehicle. The Sonata ran well, got good mileage, had a good radio and so far had been inexpensive to maintain. The dealer we bought it at took decent care of us and the vehicle.
We had owned a Honda CRV for about eight years before getting the Sonata. My wife really liked that car. She felt comfortable driving it and it was easy for her to find in a crowded parking lot. I liked it because it was a Honda and ran like a top. When I retired from my career in the Fire Service, I ended up driving most of the time. We needed a new car and bought the Sonata. We didn't use the CRV as much as we thought we would and gave it to our son.
That's how we got to getting the Mazda. Many years ago, we had owned a Mazda pick up and a 323. They both ran excellent. I really like the looks of the new CX-5's, so long story short we bought one.
I'm not going to go into detail on the purchase, just what I've experienced so far driving it.
First, the fuel gauge and tank. The fuel gauge is not accurate at all. On my first fill up, we traveled over 145 miles before the gauge moved off of full. Even at 30mpg (which we weren't getting) that would have been about 5 gallons of fuel. The tank on this vehicle is only 14.8 gallons. We should have been showing about 2/3rds of a tank instead of full. Once we hit that mark, it moved rapidly down about 20 miles per each segment on the fuel gauge. I'm keeping an eye on it to see if the accuracy picks up as it's used more.
The tank has a vent problem that does not allow you to fill up the tank to full. In both instances that I've filled the tank, when the fuel nozzle clicked off, I had to manually pull back the vapor recovery boot on the fuel nozzle to add another 2.7 gallons each time. Being able to add that much after the nozzle clicked off automatically means that there is a problem. Don't know if this will correct itself. If it doesn't, I will make sure they fix it when I take it in for it's first service.
Second issue is the software to the radio is clunky and does not work well at all. I don't own an ipod, I put my music on thumb drives and listen to the music that way. When you first start the car, it takes more than a minute to read the USB drive and if you turn off the car, it won't pick up where you left off, it starts at the first song. Navigating through your USB drive is not easy. They have no "Folder" options, so the music is all mixed up. Someone needs to go back to the drawing board and fix the software so it works like most radios do these days.
Third issue is that for a brand new car there are a lot of squeaks and clicks. To me that is poor attention to detail. I hate to say this, but the Sonata never once made any noise like this, it was solid.
Even with these issues, it is a nice car. My wife says it's fun to drive. I hope we can get these problems taken care of then it will be an excellent buy.
Thursday, December 6, 2012
1999 GMC Sierra- Door Hinge pin and bushing replacement
When I bought this vehicle, I knew it had a few minor things wrong with it. I enjoy figuring out what's wrong and trying to fix it. When I test drove it, I could tell that there was something wrong with the door. It was hard to open and shut. I could tell that it wasn't lined up correctly with the strike bolt (or whatever it's called). Another issue was that when I drove it, even with the windows closed, it sounded like the drivers door window was open. But it was a pretty good deal and I figured that I could get it fixed and learn a bit in the process.
I could tell that there was some issue with the hinges on the doors. The drivers door was way worse, but the passenger door was not right too. I started looking around on the internet and found that the hinge pins and bushings weren't designed that well on these vehicles. They tend to wear out easily. When they wear out, the door sags causing it to be misaligned and also causing the weatherstripping to not contact the door/jam as tightly as it should. That caused the wind noise. I'm sure on this vehicle the bushings wore out even quicker since it was in dusty conditions most of the time.
There are all kinds of repair kits out there to get the job done. I wanted to have the best chance for success, so I didn't go after the cheapest fix. After comparing the options, I decided to go with the "Total Auto" hinge pin and bushing repair kit. They are probably the most expensive out of all of the different ones I looked at. They are also very easy to install. They have a nice video that shows you step by step how to do the repair. I watched it several times before I actually ordered the kits and tool needed. I didn't actually buy the kits directly from Total Auto. I purchased them from "Johnson Supply Company". Maybe it was me, but I couldn't find the basic kit they talked about in the video for $55 on the Total Auto website. All they offered were kits for $69 color matched to the vehicle. Since this truck is just a work truck, I didn't care if it matched the white, the silver it came in is fine, you don't even notice it unless you're specifically looking for it.
Anyway, just so you know, the cost for the kits I needed and the tools was right at $277. Yes, not cheap, but if I had someone do it, it would have been at least double that amount, probably more. And I don't think that it would have been repairable again. With these kits, they guarantee if you use the tool they sell that you can repair the pins and bushings again. I probably won't have the truck that long however.
What I've done is take color photos of the process. The video on Total Auto's website shows the whole thing, but video is not the best of quality. These pictures show things a bit better. I would watch the videos and then if you're not exactly sure you can look at the pics I posted.
Without further delay, here are the photos with explanations: First, thought I'd show you the hinge pins before I removed them with the bushings. This is the passenger side upper hinge:

As you can see, they are quite dirty. This side was way cleaner than the drivers side was. Just so you know, my truck is a stripped down version, no power windows or power door locks. Everything is manual. So, more than likely your truck or SUV will be different. When I removed the door, I was lead to believe that they were extremely heavy. I found that they aren't that bad. I was able to remove and replace them just by lifting them off. I didn't need to use a jack or door stand (I don't have a door stand anyway). I will leave how to get the door off to you rather than suggest how to do it though.
On the above picture, the two green arrows show where you are going to need to grind to get the pins to release. I used an air driven 3" cutoff wheel to cut/grind the bottoms of the hinge pins, here is a photo of mine:

Prior to removing the door, you need to take off the door panel. Make sure you get off all of the screws holding the panel on, off. I missed one and it took me a while to figure out why it wasn't coming off. I would suggest that you get yourself a repair manual if you don't have one. The one I bought told me how to remove my panel, once I finally looked at it.
Once the door panel is removed, you can get to any wiring that goes to the door. On my truck, I had a wire going to the speaker and to the door latch. I'm not quite sure why I had one going to the latch, I think it has something to do with dome light. These pictures show the wiring and speaker locations. Also other things to do with the door.
This picture shows the wiring cover that goes from the jam to the door. The two green arrows show the tabs you need to push to release the cover from the door. I disconnected the wiring in the door and then released the cover (pushing the two tabs) and then pulled all of it out of the door:
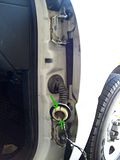
This picture shows the wiring cover that goes from the jam to the door. The two green arrows show the tabs you need to push to release the cover from the door. I disconnected the wiring in the door and then released the cover (pushing the two tabs) and then pulled all of it out of the door:

These pictures show how the wire to the door latch was routed:


What the connector looked like and where it hooked:

The wire is routed about half way between my finger and the hole where the green arrow is, and it connects right about where I drew the red circle:

These pictures show the location of the door speaker and the clip you need to push to get it to release from the door:


This picture shows the edge of the door. The red arrow shows where the door brake/stop attaches. The green arrow shows where the wiring cover attaches:

This picture is of the door brake/stop. I made sure to clean it up and lube it using white lithium grease before re-installing it:

This picture shows the door lock rod. If you have power door locks, I'm sure yours will be different. I went ahead and cleaned and lubed the points marked by the green arrows:

This last picture shows the new hinge pins and bushings installed:

I cleaned all of the grease, dirt and dust off of the door and jam. If it hadn't been so dirty, the whole job would have taken me about an hour. I spent about 2 1/2 hours on the job, start to finish. The actual replacement of the hinge pins and bushings only took me about 20 minutes.
I would say that this job isn't for a novice, but someone who is mechanically inclined wouldn't have too much trouble doing it. Good luck to you if you try this!
Tuesday, November 20, 2012
Cluster Removal on a 1999 GMC Sierra 1500 (new body style)
As I stated when I announced that I bought the 1999 GMC Sierra 1500 LS, this truck was owned by a pipeline company that works in the western US. That turned out to be significant in the fact that I didn't think about where these types of vehicles probably spent much of their time. Now I know that they spend a great deal of time on dirty, dusty roads probably in the middle of nowhere. Even though the drive train seems to have been well taken care of, the rest of the vehicle needed quite a bit of TLC. I actually didn't buy it directly from the pipeline company. I bought it from a guy who had purchased it from the pipeline company. Not sure how long he had it, but he obviously didn't care much about it other than keeping it running well.
I can't complain too much though, I got it for a fair price and it really does run great and everything on it works.
Since it was out on dirt roads much of the time, dust got everywhere. The instrument cluster had a nice layer of fine dust covering the inside of the bezel and on the gauges.
Removal of the cluster is actually quite simple. If you have a repair manual, I'm sure that they cover how to do it in there. I bought a Haynes manual at my local auto parts place. It tells you how to remove the cluster in there. Only problem is that the pictures are small, black and white and very low resolution. Hopefully the color pictures I will add here can help you out if you need to remove your cluster for any reason.
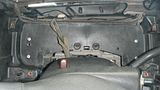
Here is how you do it: First off, you need to remove the bezel that covers all of the components of the dash. These first couple of pics show you what comes off. It's pretty simple, it just clips on the truck, no screws to remove or find.
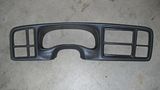
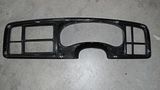
Somewhere around the edge of this bezel, you just need to grab hold of it and pull towards you. I would suggest doing it a bit gingerly, don't get overly aggressive with it. It you are careful, it should come out fairly easy. To make getting it out easier, you need to do a couple of things. First, tilt the steering wheel down as far as it will go. Second, if you have an automatic transmission, shift the gear selector all the way down to the lowest gear. You have to put the key in the ignition and turn it to be able to move the selector. I would suggest that you disconnect the battery so you don't short anything out while removing the cluster. Better to be safe than sorry. As you are moving the bezel away from the dash, you have to manipulate it a bit to get it to clear the hazard light button, but it will get past it with no problem.
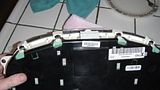
Once you have the bezel off, you can work on removing the cluster. There are four 7mm bolt/screws that hold the cluster in place. They are located one at each corner of the cluster. Here are some pictures showing where, with the cluster in and out.
This picture shows the cluster still in place, couldn't get a picture with the cluster in showing all four screw locations, there is one in the lower right corner not visible.
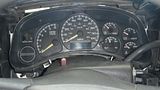
This picture shows the cluster removed and the locations of the screws:
Once you have the cluster loose, you need to pull it out a bit and remove the wiring harness from the top of the cluster. It can be a little sticky, just take your time and don't force it. There are a couple of clips that lock it into place that you have to squeeze to release it from the receptacle.
I thought that I got a picture of the wiring harness, but apparently I didn't. I did take a picture of the receptacle for the harness on the top of the cluster, here it is:

These last pics are of the clips that hold the clear plastic lens over the actual cluster.
These two are on the bottom of the cluster, if you're not sure, you can see two small black tabs sticking out from white square shapes. (I normally draw lines pointing to what I'm describing, but my photo hosting site changed the way they do things and I haven't figured it out yet.)
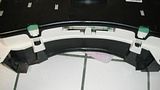
This picture is of the top of the cluster and the four tabs that hold the clear plastic cover on the cluster. They look like the bottom tabs:
Once you get the cluster opened up, you can clean it however you like. Just be careful around the gauge needles. If you're going to use some type of liquid cleaner, don't spray it directly on the cluster, spray it on a rag first and then wipe down the cluster.
Once you have cleaned or repaired your cluster, installation is reverse of removal.
Hope this helps. Good Luck.
I can't complain too much though, I got it for a fair price and it really does run great and everything on it works.
Since it was out on dirt roads much of the time, dust got everywhere. The instrument cluster had a nice layer of fine dust covering the inside of the bezel and on the gauges.
Removal of the cluster is actually quite simple. If you have a repair manual, I'm sure that they cover how to do it in there. I bought a Haynes manual at my local auto parts place. It tells you how to remove the cluster in there. Only problem is that the pictures are small, black and white and very low resolution. Hopefully the color pictures I will add here can help you out if you need to remove your cluster for any reason.
Here is how you do it: First off, you need to remove the bezel that covers all of the components of the dash. These first couple of pics show you what comes off. It's pretty simple, it just clips on the truck, no screws to remove or find.

Somewhere around the edge of this bezel, you just need to grab hold of it and pull towards you. I would suggest doing it a bit gingerly, don't get overly aggressive with it. It you are careful, it should come out fairly easy. To make getting it out easier, you need to do a couple of things. First, tilt the steering wheel down as far as it will go. Second, if you have an automatic transmission, shift the gear selector all the way down to the lowest gear. You have to put the key in the ignition and turn it to be able to move the selector. I would suggest that you disconnect the battery so you don't short anything out while removing the cluster. Better to be safe than sorry. As you are moving the bezel away from the dash, you have to manipulate it a bit to get it to clear the hazard light button, but it will get past it with no problem.
Once you have the bezel off, you can work on removing the cluster. There are four 7mm bolt/screws that hold the cluster in place. They are located one at each corner of the cluster. Here are some pictures showing where, with the cluster in and out.
This picture shows the cluster still in place, couldn't get a picture with the cluster in showing all four screw locations, there is one in the lower right corner not visible.
This picture shows the cluster removed and the locations of the screws:
Once you have the cluster loose, you need to pull it out a bit and remove the wiring harness from the top of the cluster. It can be a little sticky, just take your time and don't force it. There are a couple of clips that lock it into place that you have to squeeze to release it from the receptacle.
I thought that I got a picture of the wiring harness, but apparently I didn't. I did take a picture of the receptacle for the harness on the top of the cluster, here it is:
These last pics are of the clips that hold the clear plastic lens over the actual cluster.
These two are on the bottom of the cluster, if you're not sure, you can see two small black tabs sticking out from white square shapes. (I normally draw lines pointing to what I'm describing, but my photo hosting site changed the way they do things and I haven't figured it out yet.)
This picture is of the top of the cluster and the four tabs that hold the clear plastic cover on the cluster. They look like the bottom tabs:
Once you get the cluster opened up, you can clean it however you like. Just be careful around the gauge needles. If you're going to use some type of liquid cleaner, don't spray it directly on the cluster, spray it on a rag first and then wipe down the cluster.
Once you have cleaned or repaired your cluster, installation is reverse of removal.
Hope this helps. Good Luck.
Subscribe to:
Posts (Atom)