When I bought this vehicle, I knew it had a few minor things wrong with it. I enjoy figuring out what's wrong and trying to fix it. When I test drove it, I could tell that there was something wrong with the door. It was hard to open and shut. I could tell that it wasn't lined up correctly with the strike bolt (or whatever it's called). Another issue was that when I drove it, even with the windows closed, it sounded like the drivers door window was open. But it was a pretty good deal and I figured that I could get it fixed and learn a bit in the process.
I could tell that there was some issue with the hinges on the doors. The drivers door was way worse, but the passenger door was not right too. I started looking around on the internet and found that the hinge pins and bushings weren't designed that well on these vehicles. They tend to wear out easily. When they wear out, the door sags causing it to be misaligned and also causing the weatherstripping to not contact the door/jam as tightly as it should. That caused the wind noise. I'm sure on this vehicle the bushings wore out even quicker since it was in dusty conditions most of the time.
There are all kinds of repair kits out there to get the job done. I wanted to have the best chance for success, so I didn't go after the cheapest fix. After comparing the options, I decided to go with the "Total Auto" hinge pin and bushing repair kit. They are probably the most expensive out of all of the different ones I looked at. They are also very easy to install. They have a nice video that shows you step by step how to do the repair. I watched it several times before I actually ordered the kits and tool needed. I didn't actually buy the kits directly from Total Auto. I purchased them from "Johnson Supply Company". Maybe it was me, but I couldn't find the basic kit they talked about in the video for $55 on the Total Auto website. All they offered were kits for $69 color matched to the vehicle. Since this truck is just a work truck, I didn't care if it matched the white, the silver it came in is fine, you don't even notice it unless you're specifically looking for it.
Anyway, just so you know, the cost for the kits I needed and the tools was right at $277. Yes, not cheap, but if I had someone do it, it would have been at least double that amount, probably more. And I don't think that it would have been repairable again. With these kits, they guarantee if you use the tool they sell that you can repair the pins and bushings again. I probably won't have the truck that long however.
What I've done is take color photos of the process. The video on Total Auto's website shows the whole thing, but video is not the best of quality. These pictures show things a bit better. I would watch the videos and then if you're not exactly sure you can look at the pics I posted.
Without further delay, here are the photos with explanations: First, thought I'd show you the hinge pins before I removed them with the bushings. This is the passenger side upper hinge:

As you can see, they are quite dirty. This side was way cleaner than the drivers side was. Just so you know, my truck is a stripped down version, no power windows or power door locks. Everything is manual. So, more than likely your truck or SUV will be different. When I removed the door, I was lead to believe that they were extremely heavy. I found that they aren't that bad. I was able to remove and replace them just by lifting them off. I didn't need to use a jack or door stand (I don't have a door stand anyway). I will leave how to get the door off to you rather than suggest how to do it though.
On the above picture, the two green arrows show where you are going to need to grind to get the pins to release. I used an air driven 3" cutoff wheel to cut/grind the bottoms of the hinge pins, here is a photo of mine:

Prior to removing the door, you need to take off the door panel. Make sure you get off all of the screws holding the panel on, off. I missed one and it took me a while to figure out why it wasn't coming off. I would suggest that you get yourself a repair manual if you don't have one. The one I bought told me how to remove my panel, once I finally looked at it.
Once the door panel is removed, you can get to any wiring that goes to the door. On my truck, I had a wire going to the speaker and to the door latch. I'm not quite sure why I had one going to the latch, I think it has something to do with dome light. These pictures show the wiring and speaker locations. Also other things to do with the door.
This picture shows the wiring cover that goes from the jam to the door. The two green arrows show the tabs you need to push to release the cover from the door. I disconnected the wiring in the door and then released the cover (pushing the two tabs) and then pulled all of it out of the door:
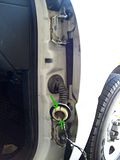
This picture shows the wiring cover that goes from the jam to the door. The two green arrows show the tabs you need to push to release the cover from the door. I disconnected the wiring in the door and then released the cover (pushing the two tabs) and then pulled all of it out of the door:

These pictures show how the wire to the door latch was routed:


What the connector looked like and where it hooked:

The wire is routed about half way between my finger and the hole where the green arrow is, and it connects right about where I drew the red circle:

These pictures show the location of the door speaker and the clip you need to push to get it to release from the door:


This picture shows the edge of the door. The red arrow shows where the door brake/stop attaches. The green arrow shows where the wiring cover attaches:

This picture is of the door brake/stop. I made sure to clean it up and lube it using white lithium grease before re-installing it:

This picture shows the door lock rod. If you have power door locks, I'm sure yours will be different. I went ahead and cleaned and lubed the points marked by the green arrows:

This last picture shows the new hinge pins and bushings installed:

I cleaned all of the grease, dirt and dust off of the door and jam. If it hadn't been so dirty, the whole job would have taken me about an hour. I spent about 2 1/2 hours on the job, start to finish. The actual replacement of the hinge pins and bushings only took me about 20 minutes.
I would say that this job isn't for a novice, but someone who is mechanically inclined wouldn't have too much trouble doing it. Good luck to you if you try this!
1 comment:
I appreciate all of you who come by my blog to read the posts I've written. Recently though, I've discovered that there are some out there who feel the need to piggyback their businesses onto my site. This is done by making links in their comments here to their websites. It took me a while to discover it, but now I know what to look for. So to those of you who would attempt this, please know that your comments will be immediately deleted. Again, thanks to all those who are coming here to learn how to repair their vehicles. AG
Post a Comment