I actually figured this out several months ago, but actually forgot that I had said I would update it if I found the problem.
A while back I wrote that I had noticed a strange thumping sound while driving the 93 525i. I looked all over the car and couldn't find the noise, so I just sort of forgot about it.
One day in early summer, I decided to get the tires replaced that had worn sort of weird before I got the front end fixed up. On the way home from the tire shop, I made a left hand turn and it felt like the right front tire was coming off. I stopped real quick and checked, but everything looked fine. When I got home, I jacked up the front end and that's when I found the problem.
I hate to admit it, but when I changed out the front struts, I must not have screwed the retaining cap to the insert down. Either that or it came loose somehow (highly unlikely since they are very long winded threads). When I looked at that wheel, it was hanging about six to eight inches lower that the other side and you could see the retaining cap just sitting there, the only thing holding the strut together was the spring. I figured that I had trashed the whole set up and started taking it apart. Once I got it all apart it appeared that everything was fine, so I put it all back together. It's been working fine since, no more thumping.
I said that I wasn't a professional mechanic and I just proved it by this little gaffe. I still enjoy working on the cars though.
Monday, December 21, 2009
Thursday, October 22, 2009
BMW E34 525i Door Brake repair
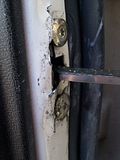
Back in the earlier part of the summer this year, I noticed that the 93 525i that my son drives had this annoying cracking sound every time the drivers door was opened. I went out and checked and found that the mounting area for the door brake was all cracked. It mounts inside of the door with the arm of it attaching to the door jam. The door brake is what keeps the door from opening to far and keeps it from closing on its own if you want it to stay open. The sheet metal was tearing and deformed. I didn't take any pictures at the time, but the brake was trying to pull its way through the sheet metal. I didn't have time to mess with it, so I took a ball peen hammer and bent the sheet metal back to near its original position. It still made noise, but at least it wasn't going to pull itself out.
For the next few months, I was kept pretty busy at work and didn't have the time to fix this problem. I thought about it a few times when I heard the pop and crack when the door was opened. I started thinking about ways that I could fix it. Most of them included some kind of welding, but I don't weld.
A couple of days ago, I finally found the time to tackle the job. I came up with a repair that only cost me six dollars and I didn't have to weld anything.
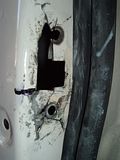
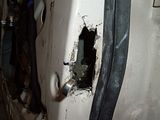
Here is a picture of the problem before I started working on it:
Here is what it looked like once I took off the door panel and could get to the door brake and remove it:
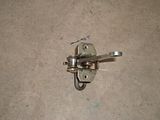
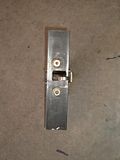
Picture of the removed door brake:
My idea for the repair was to get some metal and make a mounting plate for the door brake and then pop rivet it to the outside of the door to make the area stronger. I decided to get a piece of flat plate metal that was 1 1/2" wide and 1/8" thick. I had to buy a 36” long piece, but it only cost six dollars. After looking at what I needed to cover, I cut the metal 7” long. I took my time and laid it out the best I could and cut it and drilled it. I know it doesn't look very professional, but it works, here is a picture:
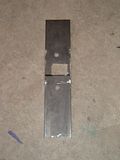
Here is a picture of the door brake mounted to the plate I made before I installed it, just to see if it fit properly:
I didn't have any special tools other than my cordless drill and a jig saw with a metal cutting blade to do the drilling and cutting. I do have an old bench grinder that I used to smooth all the rough edges.
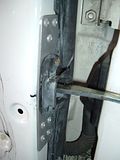
To be able to mount the door brake back on the door, I needed to remove most of the cracked and torn metal. Here is what it looked like once I did that:
To get the metal out of the way, I used one of those hand held air operated cut off wheels. I initially tried using some tin snips, but the cut off wheel worked much faster. I left as much metal on the door as I could and still be able to get the door brake mounted. I wanted to leave the metal there to add some backing to the plate I made.
I did most of the work with the door still on the car. I figured out though that I wouldn't be able to drill the door jam for the pop rivets if I didn't remove the door. It only took me about 10 minutes to remove the door, I should have done that before I started this whole project and would suggest if you're planning on doing this to take the door off first. It makes everything much easier.
I ended up having to modify the shape of the plate to get it to lay flat and to avoid sharp corners. I rounded off all four corners. The upper corner towards the outside of the door I took more off so it would fit better. Once I was happy with the way it fit, I decided where I would drill the holes for the pop rivets. I put three on the top and four on the bottom mainly due to the shape of the door. I filed and ground down the remaining rough spots, sanded the plate and painted it to protect against rust.
Once the paint was dry, I went to install it. This is where having the door off of the car really helped. I positioned the door brake where I needed it to be and found that some of the rubber weather stripping on the door was in the way. I used a utility knife to trim away just a bit of the weather stripping and then the plate laid perfectly flat. With it in the correct position, I then drilled all the pop rivet holes and installed them.
Here is a picture of the plate riveted in place with the door brake installed:
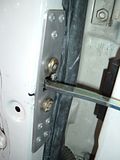
This last picture shows everything installed with the rubber boot in place:
That's it! I used the Bentley Manual for instructions on how to remove the door panel, how to remove the door brake and how to remove the door. While I was in the door, I lubed all of the door parts and the moving window parts that needed it. Done!
For the next few months, I was kept pretty busy at work and didn't have the time to fix this problem. I thought about it a few times when I heard the pop and crack when the door was opened. I started thinking about ways that I could fix it. Most of them included some kind of welding, but I don't weld.
A couple of days ago, I finally found the time to tackle the job. I came up with a repair that only cost me six dollars and I didn't have to weld anything.
Here is a picture of the problem before I started working on it:

Here is what it looked like once I took off the door panel and could get to the door brake and remove it:

Picture of the removed door brake:

My idea for the repair was to get some metal and make a mounting plate for the door brake and then pop rivet it to the outside of the door to make the area stronger. I decided to get a piece of flat plate metal that was 1 1/2" wide and 1/8" thick. I had to buy a 36” long piece, but it only cost six dollars. After looking at what I needed to cover, I cut the metal 7” long. I took my time and laid it out the best I could and cut it and drilled it. I know it doesn't look very professional, but it works, here is a picture:

Here is a picture of the door brake mounted to the plate I made before I installed it, just to see if it fit properly:

I didn't have any special tools other than my cordless drill and a jig saw with a metal cutting blade to do the drilling and cutting. I do have an old bench grinder that I used to smooth all the rough edges.
To be able to mount the door brake back on the door, I needed to remove most of the cracked and torn metal. Here is what it looked like once I did that:

To get the metal out of the way, I used one of those hand held air operated cut off wheels. I initially tried using some tin snips, but the cut off wheel worked much faster. I left as much metal on the door as I could and still be able to get the door brake mounted. I wanted to leave the metal there to add some backing to the plate I made.
I did most of the work with the door still on the car. I figured out though that I wouldn't be able to drill the door jam for the pop rivets if I didn't remove the door. It only took me about 10 minutes to remove the door, I should have done that before I started this whole project and would suggest if you're planning on doing this to take the door off first. It makes everything much easier.
I ended up having to modify the shape of the plate to get it to lay flat and to avoid sharp corners. I rounded off all four corners. The upper corner towards the outside of the door I took more off so it would fit better. Once I was happy with the way it fit, I decided where I would drill the holes for the pop rivets. I put three on the top and four on the bottom mainly due to the shape of the door. I filed and ground down the remaining rough spots, sanded the plate and painted it to protect against rust.
Once the paint was dry, I went to install it. This is where having the door off of the car really helped. I positioned the door brake where I needed it to be and found that some of the rubber weather stripping on the door was in the way. I used a utility knife to trim away just a bit of the weather stripping and then the plate laid perfectly flat. With it in the correct position, I then drilled all the pop rivet holes and installed them.
Here is a picture of the plate riveted in place with the door brake installed:

This last picture shows everything installed with the rubber boot in place:

That's it! I used the Bentley Manual for instructions on how to remove the door panel, how to remove the door brake and how to remove the door. While I was in the door, I lubed all of the door parts and the moving window parts that needed it. Done!
Thursday, May 14, 2009
Fuel Door Hinge Replacement on 93 BMW 525i
For a 16 year old car that had a bunch wrong with it when I bought it, it is holding up fairly well considering how it's being used. My son uses it to deliver Pizza's. Haven't done anything to it for several months other than put gas in it.
A couple of weeks ago, I got a phone call from my wife while I'm at work telling me that the fuel door fell off of the car. I knew that it was a common problem on the E34 and didn't think too much about it. I knew a new hinge wasn't too costly, so I wasn't fretting fixing it. The next day when I got home, I checked and found that the hinge had broken. I ordered a new one from Autohaus, the shipping was almost as much as the hinge itself.
This first picture shows all of the pieces it broke into while I removed it. It was pretty much intact until I had to break all of the plastic out of the two mounting brackets mounted on the car.

Apparently someone in the past had a difficult time replacing the hinge and just glued it in place. You can see the glue residue (arrows) around the square mount holes in this picture. I cleaned it up to this point and just waited for the new hinge to arrive. It came a few days later.

I poked around on the internet trying to find someone who had actually showed some pics and instructions on how to replace the hinge, but didn't find anything real good. I didn't spend a lot of time looking, I'm sure there are other “How To's” out there that would be helpful. Bentley's manual had nothing on replacing the hinge in it.
When the hinge showed up, I was at work, so the next day, I was able to make the repair (or so I thought).
I went out to the garage and did a test fit. I slid the tabs that fit into the door itself in place (green arrows)

Here are the slots on the door that the tabs on the hinge slide into:

That was easy. Next, I attempted to fit the door and hinge into the two square mounting holes on the body (see second picture). They fit OK, but would not lock into place.
If you look closely at this picture, you can see that you have to angle the hinge to get it to slide into the two mounting holes on the body:

I tried for several minutes to try and get the mounting tabs on the hinge to lock in place in the square mounting recepticles, but they wouldn't pop in.
Unfortunately, I don't have a good picture of what happened next. I hope I can explain it so you can understand what I'm trying to tell you. On the picture below, you can see the two tabs that are supposed to snap into the mounting holes. On the backside of the tabs (below the arrows), there are flexible pieces that have a notch cut out that is supposed to snap into place on the backside of the mounting holes (at least I know what I'm talking about).

I didn't realize that the glue stuck on the mounting holes was making it impossible for the tabs to lock in place. I had a brain fart or something. I tried using a screwdriver to push the tabs in place and ended up breaking one of the tabs. Sixteen bucks down the drain. I ordered another hinge and it came a couple of days later.
This time I figured out the problem and scraped all of the glue and paint off of the holes. When the new hinge arrived, it took me a few minutes to get it all together. The second hinge wasn't exactly the same as the first one. I had to make the opening in the mount holes a teeny bit bigger and then it snapped in and locked.
After getting it together, I figured I was still missing something. I didn't even notice that the spring clip that holds the fuel door shut was missing. That must have been the reason why the fuel door didn't lock on occasion, duh! I ordered the part from BavAuto, Autohaus didn't carry it. The day after I ordered the spring clip, for some reason, I remembered when I had just bought the car, I cleaned out the trunk and found a clip similar to what I needed. I checked and found that it was the missing spring clip, I had put it with a bunch of other stuff I found in the trunk.
I think you're supposed to install the clip while you have the door off the car. I had already put it on and didn't want to chance breaking another hinge. So I thought about how I might be able to install the clip after the door was mounted. It actually was pretty simple. If you look at the picture below, I took a long flat bladed screwdriver and pushed on the clip where the arrow is pointing. I closed the door so it was only open about an inch and then pushed after I made sure that the clip was secured on the door itself in the correct spot. One push and it clipped to the detent in the back of the hinge.

That's it, Good Luck!
Tuesday, March 3, 2009
Changing Belts on the BMW E34-M50 Motor (525i)
The M50 motors use two drive belts to power all of the accessory stuff on the motor. The larger belt, which has to be installed first is driven by the crank pulley and drives the Fan/Water pump, the alternator and the Power steering pump. There are two other pulley's that are in this system also, one is the actual tensioning pulley and the other is an idler pulley. To change this side's belt, the only thing you really need to know is which one is the tensioning pulley.
Here is a picture of the routing of the belt on this side:

The arrow I've drawn is the location of the tensioning pulley. Depending on your tensioner, you will either use an allen wrench or a regular wrench or socket to take the tension off the belt.
Once you've determined what you need, you turn the wrench clockwise (oriented with you facing the front of the car) or to put it another way, turning the wrench towards the drivers side of the car. Once you've done this, the tension should be loosened and you can slip the belt off of the pulley. I've done this so many times now, I can do it in my sleep. Installation is reverse of removal.
One other thing for this side, it can be done with the Fan and Shroud installed, but to save yourself some time and frustration, it is much easier just to remove the Fan and Shroud.
The other side is also driven by the crank pulley, however, it only drives the A/C Compressor. There is only one other pulley there and it is the tensioning pulley. On both of my 525i's, you use an allen wrench to un-tension the belt. This side is the same, clockwise takes the tension off the belt. This belt goes on last due to the way the crankshaft pulley is set up. If you just have to replace this belt, you don't have to remove both belts.
Good Luck!
Friday, February 27, 2009
Head Gasket Fix in a Can, NOT!
Thought that I'd write about the experience I had using three of the Head Gasket Fix products that I found on the internet.
Shortly after buying the 95 BMW 525i last year, I discovered that I had a leaking Head Gasket (actually ended up being a cracked head). I started doing research and came across these three products:
Heal a Seal
Steel Seal
ThermaGasket
I did some pretty extensive reading over the course of a week or two and decided that I'd try the "Heal a Seal". Let's face it, I was looking for the cheapest way out and the Heal a Seal was the Cheapest that guaranteed success. When it came, the instructions with it looked like it was written by a 3rd grader. It was one long run on sentence. I read it over and over and finally thought that I sort of understood it. It said if you had questions to call their Tech Support, so I did. I talked with this guy who I doubt had much past a 4th grade education. He was abrupt and in my opinion not knowledgeable at all about the product that he was supposed to know about. I let him know that I was going to do the treatment like the instructions said and he basically told me what was written down on the sheets, only more confusing than the written ones.
I'm pretty sure I followed the instructions, but it didn't work. I really didn't want to deal with these guys again, so I did not try to get my money back. DO NOT try this product, you are wasting your time and money if you do.
Next up was "Steel Seal". The product was a bit more expensive than the first, but application was a breeze. The instructions were easy and quick. Only problem was it didn't work either. I spoke to their Tech Support guy and he was very helpful and friendly. Their Customer service guy was great too. I really wish that it would have worked. I left the Steel Seal in the car for about five hundred miles, but it didn't help. I emailed the Customer Service guy and told him what had happened and he immediately refund the full purchase price of the product. Even though it didn't work, it was still a good experience.
Last one I tried was ThermaGasket. This stuff is a two part mix. You have to make sure all of the coolant is out of the system to treat your car. I had read several stories of people who had used it with good results. I figured what the heck, one more try before I do the head gasket the old fashioned way. The stuff came, the instructions were pretty simple. They asked that you call them before you add the second half of the product if the first part of the treatment didn't seal the leak. So, I called, because the first part of the treatment didn't seal it up. I talked with the Tech Support guy who always sounded like he was out on a Highway somewhere when I talked to him, maybe it was just his phone. I explained what I'd done, and he gave me the OK to add the second half of both bottles. I added it, followed the instructions again, and UNBELIEVABLE, the leak seemed to have stopped. I was shocked. I drove the car for a couple of days and it wasn't using any coolant. But soon after it started using coolant again. I call the Tech Guy and he tells me to go and buy a product that is "Compatible" with their product called "Liquid Aluminum". I asked if this would plug up my radiator (I had a problem with a similar product years ago that plugged my whole radiator on another car). The guy says it shouldn't, so I go buy it and put it in the cooling system. I happened to be at work that day and put it in before I traveled home, which is a 40 mile drive. As I'm driving, I notice that the temp gauge is a bit higher than normal. I watch it climb and climb and climb. I turn on the heat to full blast and open my windows. I get in the slow lane just in case I have to pull over. Luckily the temperature gets to just below the 3/4 hot mark, but stays there. I limp it home and park it. Later in the day, I drain the cooling system and flush it several times to get the Liquid Aluminum and the Therma Gasket out. I put clean water back in and drive it around. It seems to be running just a tad bit hotter than it used to, but not that bad.
I was ticked that the Tech guy did that to me. I sent off an email to ThermaGasket's Customer Support totally expecting a pain to get my money back, but they refunded me immediately too. I think it was me telling them that they ruined my radiator that got them to refund me so easy.
I figured that I was going to have to start saving up the money to start buying the stuff I needed to do the Head Gasket. I told my daughter to drive the car and to watch the temperature gauge closely. I checked the coolant level every day and it was not losing any fluid. I drove the car back and forth to work a few times and it was running OK. I left the thermostat out of the system, that was to facilitate the treatments I tried. It took a while to warm up, but it didn't seem to affect the performance of the car.
I wrote about the Head Gasket replacement earlier in this Blog. The ThermaGasket held for about five months. It got me through the summer and I was able to save up enough money and get the tools I needed before it blew.
Even though it worked for a bit, I don't think I'd try ThermaGasket again. I would just go straight for the old fashioned way.
Saturday, February 7, 2009
Battery Location on E34 BMW's
UPDATED OCTOBER 16, 2010 WITH PICTURES
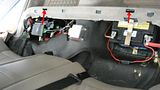
I've received a few requests from people to know the location of and how to change a battery on an E34 BMW. On my 525i's, and most other versions, the battery is located under the rear seat on the passenger side.
To get to the battery (especially if the seat hasn't been out in a while), I've found it easiest to move both front seats forward as far as they can go and tilt the seat backs forward too. I'm 6' tall and can easily get in the back seat area standing up, bent over though, to get some leverage to pull up on the back seat cushion. If the seat cushion hasn't been out of the car for a while, it may be a little stubborn, but I promise it will come out. What I do is while standing facing the rear seat is grab the bottom edge of the seat about in the middle of both the outside seats. Pull up real hard and it should come out. There are two tongue like clips on the seat cushion that fit into slots on the bottom.
Here is a picture of the seat bottom out of the car upside down showing the "two tongues":
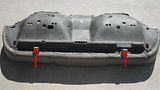
This picture shows the slots that the tongues fit into:
If you look or feel near the bottom of the seat, you can see where the cushion ends and the mounting area (for lack of a better term) comes together. Once you have it loose, you can get out of the car and then you can pull the seat out either door.
Alternate way to get the seat out, if it has been out recently, is to pull up in the area of the tongue/slot one side at a time. That is the way I do it now, since I've had the cushion out several times.
As far as changing the battery, it's pretty straightforward. Take off the two battery cables and then remove the hold down clip that is located at the base of the battery. The battery posts take a 13mm and the hold down clip bolt is a 10mm. These batteries have a tube that vents the battery to the outside, so pay attention when removing it. The new battery I bought for my 93 recently had the correct tubing to adapt to the vent tube, but it was in a different location on the new battery compared to the one I was replacing. Depending on the make of battery you have, you may need to re-route the tubing a bit.
Putting the seat cushion back in is pretty much the reverse of taking it out. You just have to make sure that the center seat belts are on top of the seat cushion when you install it. Also, the ends of the seat cushion need to fit under the seat belt receptacles near both doors. Those tongues can be a bit tough to get back in their slots, but if you get everything lined up, trust me, they do go back in where they are supposed to be.
Good Luck!
I've received a few requests from people to know the location of and how to change a battery on an E34 BMW. On my 525i's, and most other versions, the battery is located under the rear seat on the passenger side.
To get to the battery (especially if the seat hasn't been out in a while), I've found it easiest to move both front seats forward as far as they can go and tilt the seat backs forward too. I'm 6' tall and can easily get in the back seat area standing up, bent over though, to get some leverage to pull up on the back seat cushion. If the seat cushion hasn't been out of the car for a while, it may be a little stubborn, but I promise it will come out. What I do is while standing facing the rear seat is grab the bottom edge of the seat about in the middle of both the outside seats. Pull up real hard and it should come out. There are two tongue like clips on the seat cushion that fit into slots on the bottom.
Here is a picture of the seat bottom out of the car upside down showing the "two tongues":

This picture shows the slots that the tongues fit into:

If you look or feel near the bottom of the seat, you can see where the cushion ends and the mounting area (for lack of a better term) comes together. Once you have it loose, you can get out of the car and then you can pull the seat out either door.
Alternate way to get the seat out, if it has been out recently, is to pull up in the area of the tongue/slot one side at a time. That is the way I do it now, since I've had the cushion out several times.
As far as changing the battery, it's pretty straightforward. Take off the two battery cables and then remove the hold down clip that is located at the base of the battery. The battery posts take a 13mm and the hold down clip bolt is a 10mm. These batteries have a tube that vents the battery to the outside, so pay attention when removing it. The new battery I bought for my 93 recently had the correct tubing to adapt to the vent tube, but it was in a different location on the new battery compared to the one I was replacing. Depending on the make of battery you have, you may need to re-route the tubing a bit.
Putting the seat cushion back in is pretty much the reverse of taking it out. You just have to make sure that the center seat belts are on top of the seat cushion when you install it. Also, the ends of the seat cushion need to fit under the seat belt receptacles near both doors. Those tongues can be a bit tough to get back in their slots, but if you get everything lined up, trust me, they do go back in where they are supposed to be.
Good Luck!
Sunday, February 1, 2009
Tire Rotation and other things
Yesterday, I decided to try and stretch the life of the nearly worn out tires on the front of the 93 525i. I went ahead and rotated front to back. I looked at the tires when I had them off the car and they didn't really look that bad, so I figured I could wait until my measley tax return comes. The front tires (that were on the rear) look in really good shape. Can't decide now if I'm going to just replace all four, or put two new on.
I also, finally was able to drain the fluid in the rear end and replace it with some synthetic. I was afraid of what it might look like considering when I did the trans fluid, it was really bad. But it didn't look that dirty, although it's hard to tell with the heavy oils. The reason it took me so long to get to this was I had been trying to fabricate my own tool to remove the plugs on the differential. It takes a 14mm allen wrench. It's pretty cramped trying to get to the fill plug, so you need a short one. I tried making one out of some metric nuts and bolts, and it would have worked if I could have tack welded it, but since I'm no welder or have a welding machine it wasn't going to happen.
I went to Autozone and bought a set of three 1/2" drive allen wrenches, 12, 14 and 17 mm, for $12. I had checked on line and the cheapest I found the BMW special tool for this job was I'm thinking $35 bucks. It was just a stubby 14mm allen wrench. The ones I bought at Autozone had the allen wrench part on it about 1 1/2" long. I figured I could cut about and inch or so off and use a 14mm 3/8" drive socket. I did it and it worked perfectly. So now the rear end has brand new clean fluid in it.
The battery on the car was dying, so while I was at Autozone, I picked one up. Beforehand, I looked all over the place, the batteries for these cars aren't really easy to find. I paid $90 for this one and it fit perfect. The part number for the battery at Autozone is 49-DL.
While I had the car up on jacks, I decided to do an oil change. I had purchased some motor flush from autohausaz back when I was ordering all of the parts for the Head Gasket job on the 95. I added it to the crankcase with the motor at operating temperature, running and following directions on the can. I let it idle for 10 minutes and then shut it off. When I got the car running back in August, when I changed the oil, I added about a pint of Marvel Mystery oil to the rest of the oil. It does a pretty good job of cleaning up sludge and other gunk in a car that might not have had the best of care in the past. I found a ton of crap under the valve cover when I was changing the valve cover gasket. It had taken me a good hour or better of scraping and cleaning with degreaser and high pressure washing to get most of the gunk out of there. I figured I'd put a couple of thousand miles on the motor after I put it back together with the "Mystery Oil" in it. I was just about there when I changed the oil yesterday. I figured the Motor Flush would help get the rest of the junk out. When I refilled, I used Castrol 20W50 with the sludge inhibitors. We'll see how it works.
The car seems to run really well now. But I noticed a weird thumping like noise. It actually started up right after I had the front end alignment done. My son came home one day saying he was hearing the noise. I took it out and didn't hear anything different than the normal car noises. After I finished all of the work on the car yesterday, I drove it back to Autozone to get my core charge back on the battery I bought and noticed the noise. There really isn't a pattern to it, what it sounds like to me is something hanging up in the undercarriage and occasionally bumping the floor of the car. It only seems to do it while driving on less than smooth surfaces. I drove on a newly paved street and it didn't make a noise. I'm thinking maybe the worn tires are making some weird noise or maybe some suspension part is popping, sort of like something getting bound up and then releasing. As soon as I figure it out I'll post what it was, maybe it will just go away.
Wednesday, January 21, 2009
Alignment
Just a short post about the alignment I had done today on the 93 525i. I took it in and talked to the guy who was doing the alignment before he got started. I explained to him what I'd done and he said don't worry, we'll get it right.
About 45 minutes later he's done. I asked how bad it was and he said "you could have gone without getting it done, all the settings were within specs. I tweaked them a bit, but it was fine."
I guess I should start my own alignment shop, LOL.
About 45 minutes later he's done. I asked how bad it was and he said "you could have gone without getting it done, all the settings were within specs. I tweaked them a bit, but it was fine."
I guess I should start my own alignment shop, LOL.
Monday, January 19, 2009
93 VANOS Gasket and Outer Tie Rods
Today, I decided that I would try and fix an oil leak that shouldn't have been there in the first place. Back when I put the rebuilt VANOS unit on the 93 525i, I was a bit confused by the installation instructions and didn't do one of the things they said to do correctly. When you are putting the VANOS back in, you need to put some sealant around the two end indexing dowels that help line up the gasket. I didn't do it properly when I put the VANOs back together the first time and it developed a leak right where you would expect one.
This morning I got up early to work on the car because my son needed to go to class, but ended up not going because he is sick. I started on it a little before 6 am. The whole thing took me a little more than two hours. Since I had just put a VANOS unit on the 95 525i when I did the head gasket, I could almost do it from memory, but I didn't. Everything came apart and went together quite quickly.
It started up and ran great.
Later in the day, since the car was just sitting there, I decided to change out the Tie Rods. Originally, I was going to replace the Center Tie Rod and the two outer Tie Rods. But after checking it out, I decided to just do the outers. The Center looked and felt to be in good condition.
This job only took me an hour to complete. I was able to use my new handy dandy ball joint tool to remove the Tie Rods, and it worked perfectly. When you are installing new outers, you need to make sure that you get the length right or the alignment can get way out of whack. The way the outer Tie Rods are set up is a Rod had two screw in ball joints, one on each end. One end had left hand threads and one end has right hand threads. It's done this way so the rod can be turned one way or the other to make the space between the ball joints longer or shorter. I know that it affects toe-in and toe-out.
I thought that I had measured and got the new ones very close to the old. Apparently not so much. When I got the parts all back together, I took it out for a test drive. Man, the steering felt really weird. I went around the block and when I turned it almost seemed like the steering wheel wanted to turn on it's own. I got back to my driveway and could see tire marks on the concrete. It looked like someone had burned out on the drive. As I pulled back in, I looked in the rear view mirror and could see I was leaving more marks. Something was definitely not right.
I pulled it back in to the garage and parked. I looked at the tires and could tell that the backs of the front tires were protruding almost an inch more than the front. I remembered when I put the outer Tie Rod ball joints back into the steering plate, I had to move the steering plate out a bit. I thought that I'd bumped them while removing the old Tie Rods, but apparently I hadn't done such a good job of measuring the old Tie Rods, or getting the new ones set up correctly.
I put it back up on the jack stands and turned the Tie Rods one turn in (pulled the back of the tire in) on both sides. Tightened everything up and what a difference, it felt like before. One of the reasons I put new stuff on was the rubber boots were torn on the Tie Rods. I also needed to get it into the shop for an alignment and didn't want to send it there without putting the new Tie Rods on. The tires were wearing badly on the outer edges, to much toe-in I think. Anyway, I decided to turn the Tie Rods one half turn more. Figured it couldn't hurt since the tires are trashed anyway.
I have an appointment to get it aligned on Wednesday. I'm going to need two new tires too.
Sunday, January 18, 2009
Control and Thrust Arms
Yesterday I decided to go ahead and put the Control and Thrust arms on the 95 BMW. Since I had done them on the 93 BMW a few months back, I figured it would take me a couple of hours.
There really isn't much to it. I followed the Bentley manual since I hadn't done it for a few months. When I replaced the arms on the 93, I had also removed the struts which made it a longer job. To replace the arms you don't have to remove the struts, you just have to remove the steering plate off of the bottom of the strut housing. Just three bolts for that. I loosened up the through bolts on the ends of the arms that attach to the undercarriage so I could move the arms around a little easier when I was trying to remove the ball joints from the steering plate.
I had purchased a universal ball joint removal tool a couple of months back when I bought some other tools. Here is a picture of the tool I used:

It seemed big and bulky enough to do the job easily. Once I had the steering plate free, I was able to access the ball joints. I was working on the drivers side first and chose to remove the Thrust arm ball joint first.
I installed the tool and started tightening the arm of the tool. I tightened and tightened, but nothing. I tried loosening up the tool, but it felt like it was binding. I ended up using my impact wrench to loosen it. Once I got it off of there, it looked like the threads on the bolt had stretched, they seemed farther apart than they should have. I lubed them with a small amount of grease and tried it again, no luck. I got my propane torch out and heated up the steering plate around the ball joint (that is the way I ended up getting the ones off of the 93). I went back to my pickle fork ball joint remover. After beating on it for what seemed like forever, all I did was bottom out the pickle fork, still didn't release the ball joint. I sprayed some penetrating oil on the stuck ball joint and went to work on the Control arm ball joint. I heated it up first, pounded the pickle fork in and it came right out.
I went back to the Thrust arm, pounded the pickle fork in several more times, heating it up each time, and nothing. My arms were starting to cramp up from swinging the mallet so much. I finally decided to take off the tie rod end that attaches to the steering plate (there are three ball joints on the steering plate, the Thrust and Control arms and tie rod end). I used the special tool I had purchased on it since the Tie Rod end ball joint wasn't damaged at all. The ball joints for the tie rods are quite a bit smaller than the arms. I put the tool on it and tightened it up and "pop" it was off. I was able to remove the steering plate along with the entire Thrust arm still attached. I took it over to my work bench, put it in my vice, heated it up again and then hit the ball joint bolt about 10 times before it popped out.
At this point, I was about three hours into a job I thought would take maybe two to three and I hadn't even finished one side yet.
Reassembly went quick, no problems. I started on the other side and it went like the other did. The Control arm ball joint came off quickly, but the Thrust arm was a Bear. I didn't spend as much time on this side before I removed the Tie Rod end from the steering plate. Took everything over to my work bench and this one came out much easier than the other.
Reassembly went a little slower on this side. I had some trouble lining the steering plate back up with the bottom of the strut, but it finally went back together. I followed the Bentley manual and tightened everything back up to specs, even got the right amount of weight in the car before I torqued the through bolts on all of the arms.
The entire job took me about 5 hours. I was pooped when I finished. I cleaned up the garage, went and took a shower and then went out for a test drive. Drives much better now. It felt a bit sloppy in some turns before and you could feel it sort of shift forward when you would come to a stop. That's all gone, a much more solid ride.
Sunday, January 4, 2009
Head Gasket Epilogue
The car is still running very well. It isn't using any coolant and seems to have good power.
It is in the shop now, I'm having the oil pan gasket replaced. After trying to do the job myself while the head was off, I decided to treat myself and have someone else do it. It was seeping pretty bad, so I decided to do it now instead of later.
I just received the core refund back from the company I bought the head from. They told me that the head was cracked from one of the water jackets to a valve seat on the number 3 cylinder. That makes sense to me since I was pretty sure that the number 3 cylinder was where the leak was. That bubble in the head gasket probably had nothing to do with it leaking.
Subscribe to:
Posts (Atom)