I hooked up my code reader and there were no codes. Thought it might be a vacuum leak somewhere, so I checked and found nothing. Then the problem stopped for several weeks.
One morning I went out to go to work, cranked the starter and it wouldn't fire. Tried a few more times and it wouldn't start. Didn't have time to mess with it, so I drove my other car. The next day when I got home from work, I was going to find out what happened. I went out to the car, cranked it over and it started right up. I came away scratching my head over that.
It ran fine for about another month. I had driven home from work and had to park in a place other than my normal spot because my daughter had a bunch of friends over. Later in the afternoon, they had all left so I moved the car, it ran fine. It sat there all night until I went out to drive the car to Church. I cranked it, the motor acted like it wanted to start, but quickly died and then nothing.
Over time, I had found that you could hear the electric fuel pump fire up before you start the car. If I put the key to the #2 position, it would make a short whirring noise and then shut off once it pressurized the system. The morning that I tried to start it before Church, the whirring noise was more of a grinding noise. I tried starting it several more times during the day and nothing.
I decided that the fuel pump was DOA. I ordered a new one the next morning from autohausaz. I had to wait to make sure that I got the correct one. Apparently there are two different versions that work on my car, so I needed to remove the old one to make sure I ordered the right one. The two versions were about $70 different in price, so I was sure that mine would be the more expensive one. I got up early and started the job. I read the Bentley manual instructions on how to remove the pump, but skipped the part where it tells you to drain the fuel tank. Probably not the best way to do it, but it's what I did. All of those reports of gas tanks exploding are greatly exaggerated, I know from experience.
Anyway, the removal of the fuel pump/sending unit is fairly simple. I took some pictures and will post them with explanations below. BTW, when I took out the fuel pump, I discovered that I had the cheaper one, so I saved about $70, that doesn't normally happen to me, I always seem to be on the short end of the stick in situations like this.
The fuel pump is in the fuel tank. To get to it, there is an access hole under the carpet of the trunk. Here is a picture:
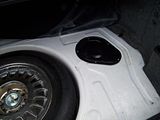
Here is a picture of it with the access cover off:
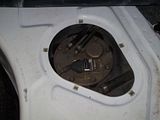
This picture is a close up of the top of the fuel pump/sending unit. To get it out, you have to remove the two fuel lines (I marked the left one with the electrical tape to make sure I put it back together right), the electrical connector and the eight mounting nuts that hold the plate to the tank. To remove the electrical connector, you have to slide the metal clip towards the back of the car. I put a small screwdriver in where I drew the green arrow and pried back and it came right off.
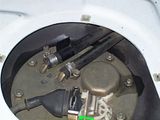
Once you have everything loose and disconnected, the plate will want to push upwards. There is enough play in the fuel lines and wiring to where you can take the sending unit out of the tank so you can get your hands on the retaining clips that hold the fuel pump in the mounts in the tank. Make sure that you make note of how everything is oriented as you remove it from the tank. The Fuel Lines from the mounting plate to the pump have to twist around the sending unit so it sits properly in the tank. I wasn't really careful when I removed mine, so it took me a bit to figure just how it went back in. I didn't take any pics of me removing the unit since no one was home when I was doing it. Here is a picture of the entire unit after I got it out of the tank:
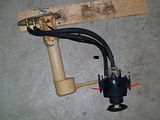
The two red arrows I drew on the last picture (click on the picture to enlarge it) show the clips that hold the pump in it's mount in the tank.
This next pic show the wires connected to the old (bad) pump:
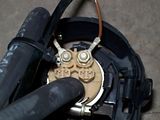
The new pump came with a different type of electrical connector, spade bits with a plastic clip the spade connectors clip in to. The pump is made by Bosch. They supplied everything you need to change the connectors except for the proper crimping tool for the job. I did my best to get them tight, but apparently my best wasn't good enough. I'll get to that in a bit. Here is a pic of the set up on the new pump. I made sure I oriented the wires the way they were on the old pump:
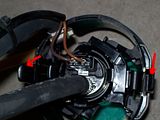
Also, note that I drew red arrows on the previous pic showing the clip locations from the top of the pump.
Other than changing the wires, all you have to do is transfer the fuel lines over to the new pump.
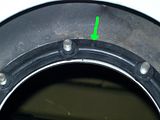
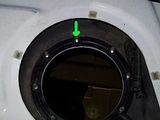
Installation is just reverse of removal. I would suggest that you replace the rubber gasket to the pump/sending unit. I took a couple of pics to show you how it goes on. I didn't pay attention when I removed the old one, so I had to play with it a bit to get it on right. There is a little indexing mark on the gasket to help you orient it right, I drew green arrows to show when it needs to be to go on correctly.
This pic shows the mark:
This one shows where it needs to be installed to fit properly (just to the right of the bolt):
Once you have everything back in and secured, make sure you torque the nuts to 89 inch pounds.
I then tried to start the car, but nothing. I tried a couple of more times, but it wouldn't start. I took the pump back out and found that I hadn't done such a good job of crimping the wires, one had come loose when I put it back in the tank. I tried to get the spade connectors out of the little plastic clip without damaging them, but was not successful. I ended up buying some solderless connectors of the same type at Radio Shack and put them on. The plastic clip was no good any longer, but the spade connectors were really tight once I put them on the spades.
I put everything back together and tried again, NOTHING. Cranked but no fire. The only other thing that I could think of that could be wrong was that the wires were not hooked up to the right terminals. I took everything back apart, switched the wires, put it back together, and SUCCESS. After being so careful to get the wires in the right position, Bosch swapped the terminal locations. I read through all of the installation material that came with the new pump and there was no mention of any wiring changes at all.
At least it works now, and it seems to actually run a bit stronger than before. I think maybe the old pump was weak before it finally gave up.
Good Luck if you try this, it isn't really very hard. If things had gone right the first time, the whole job would have taken me about an hour.
One other thing, I changed out the fuel filter while I was at it. They recommend doing so in the installation paperwork that comes with the pump.
4 comments:
Thanks for the info, this is not an easy task on domestic vehicles most need the tank droped to service the pump.
your awesome! i neglected to take pictures before taking it all apart so yours saved the day also you described the exact problem i was having and corrected the same way as you thank you for posting this
How much was your fuel pump? Thanks for the great instructions
ejohnson, sorry, but it's been nearly six years since I put up that post, I have no idea how much it cost back then or now. A simple internet search should provide the information you're looking for.
Post a Comment