MAKE SURE YOU READ THIS ALL THE WAY THROUGH BEFORE STARTING THE JOB, JUST SO YOU DON'T GET AHEAD OF YOURSELF.
So to this point, you should have your Instrument Cluster in your hot little hands. Here is a picture of what it looks like out of the car, before taking it apart to get to the circuit board.
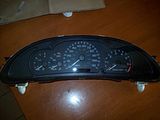
I regret that I forgot to take some pictures of the clips that hold the Cluster together, but once you have yours out of the car, you should be able to figure out how to get it apart. It is pretty obvious.
The main reason the gauges, speedometer and tachometer fail on these cars is due to faulty "Stepper Motors". Long gone is the day of speedometer and tachometer cables and real gauges that took information from sending units. All of that information nowadays is sent by electrical impulses to the Stepper Motor and then displayed on your Cluster.
This is a picture of what the Stepper Motor looks like. The one on the left is the Updated replacement to the one on the right. You can see the GM part number for the new motor... X25.168.
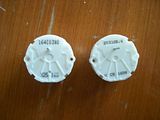
These shots of the Stepper Motors give you a better idea of what they look like.
Front side showing the shaft that the needle attaches to.
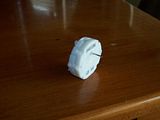
Rear side showing the two white indexing pins and the four wires you solder to the PCB (printed circuit board).
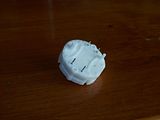
Now for the repair steps.
Once you have removed the clear plastic front to the cluster and the back cover that protects the circuit board this is what you will see.
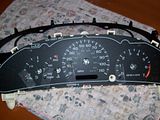
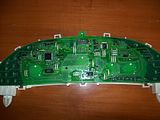
You can see on the face of the gauges in the previous pictures that I have placed tape near the starting point for the gauges, speedometer and tachometer. This is done to mark the location of the needles prior to pulling them off of the Stepper Motor Shaft. I couldn't find any masking tape, so I used Scotch Tape. Just make sure you can write on the tape. To get the needles to the correct position, you turn them slowly and gently counter clockwise until they stop. That should be the starting or resting point for them. Once you have all the needles to that position, go ahead and mark the needle position on the tape you stuck to the gauge faces.
Here is a close up of my son's cluster so you can see the marks I made. I wish I had taken a photo or two of the cluster prior to removing the needles so you could see how bad they were. The Temperature and Fuel gauge were pointing to the six o'clock position and the Speedometer was registering about 45 mph when the car was parked and not running. The only gauge working was the Tachometer.
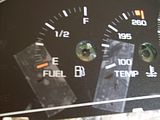
Once you have the needle positions marked on the tape, it is time to remove the needle from the shaft of each Stepper Motor. The instructions I followed were included with the motors I got on Ebay. Take each needle and turn it slowly counter clockwise until you feel it break loose from the Stepper Motor shaft. Don't worry, it shouldn't break, mine didn't. Once all of the needles are loose, take a Dinner Fork and place it under the base of the needle. Slowly and gently pull up on the needle to get it off of the shaft. It's a bit scary, I know, but it works just as I've written it. Remember which needle came off of which gauge so you put them back on the way they were.
You should be able to pull the cluster face off now. I didn't get a picture of the side of the PCB with the Motors on it. It's not really important since you work off the back side when removing the motors.
The following pictures show you the locations of the Stepper Motors on the business side of the board (soldered joints).
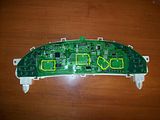
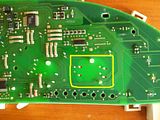
The first picture shows location of the four motors, see the yellow outlines. (If you want to see larger pictures, just click on whatever picture you want to see larger and you will see the larger size.) If you look closely, you can see the outlines of the motors through the PCB.
The second picture is just a close up of one of the motors on the board. You can see the outline of the motor more clearly in this picture. You can also see the two indexing pins that locate the motor properly on the PCB. I put a little red dot next to the soldering points on the PCB for the motor. These are the spots you will need to work on. It is quite easy to locate these spots for each of the four motors if you have the PCB in front of you.
Now all you have to do is remove the motors and solder in the new ones. I know, it sounds like a tough job, but it really isn't. I have a very basic knowledge of soldering and it only took me about 20 minutes to do the job.
What you have to have to complete the job is a soldering iron and some way to de-solder the joints. I bought a De-soldering Iron at Radio Shack for $11. It is extremely easy to use and makes the job a snap. I would guess it took me less than five minutes to remove all of the motors from the PCB using the De-soldering Iron.
Here is a picture of the De-soldering Iron.
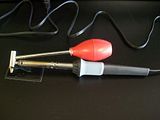
As you can see, it is nothing more than a soldering iron with a suction bulb attached. You squeeze the bulb, put the tip on the joint, let it heat for about 3-4 seconds and let the bulb go and remove the tip. Very simple. Just follow the instructions with the Iron. Also, there are several very good de-soldering videos on youtube you can watch, I found several, so go there and look if you want more information.
Once you have all the motors removed, you need to get the new motors in place for soldering. Make sure the wire pins go into their respective holes without folding under. They need to be sticking out through the holes to solder them in place. Just take your time, it isn't hard. Once the new motors are back in place, solder them all up. Again, youtube has several good soldering videos to help you out. I bought a nice little 30w Iron at Harbor Freight for $4 and it worked perfectly.
Here is a picture of the one I bought.
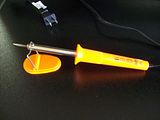
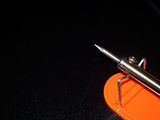
Make sure you have a pencil type tip, it makes it easier to get around those small joints. Here is a close up of the pencil tip:
When soldering on a PCB, use 60/40 ROSIN core solder. Do NOT use acid core solder unless you want to ruin your circuit board. I bought some .032" solder. The smaller diameter makes it melt quicker, not as much mass to heat up.
This is the solder I used:
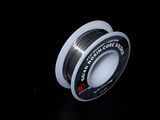
The soldering probably took me about 10 minutes or so to complete.
Once the soldering is done, you can put the Cluster back together. Just reverse the steps you did to take it apart. When you are ready to put the gauge needles back on, here is how you do it.
Put the needle on the shaft at the 12 o'clock position and push it on. Once they are all installed, turn the needle counter clockwise until you line up the needle with the mark you made on the tape. When you get to the mark, stop. That should be where each needle is at rest. You can put the rest of the cluster back together and get ready to put it back into the car.
As I stated in my previous blog entry on removal of the Dash on the Cavalier. I removed the fuses for the Instrument Cluster and the Air Bags. If you didn't follow my instructions regarding the Dash, I would suggest you remove those two fuses just to be safe.
Now, go out to the car and put the Cluster back where it is supposed to be and hook up the plug to the back. Now, put the Instrument Cluster fuse back in and you should see your needles set themselves to their resting points. If everything looks good, go ahead and put everything back together. When we did this on my son's car, the Speedometer was reading about 1 mph. We pulled the fuse, removed the cluster and opened it up. Moved the needle a little bit more counter clockwise and then put it back together. This time it was in the right spot.
We finished up by putting the dash back together and then starting the car. Everything seemed to be working correctly. Here is a picture of the Cluster while we were driving around checking it out.
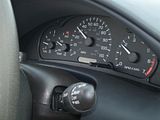
As you can see, everything seemed to be working properly. We used a GPS to make sure the Speedometer was working right and it was right on.
This little repair could cost you upwards of $500 if you have someone repair it for you. Even with buying the Soldering Iron, De-Soldering Iron, Solder and Motors, we had just under $60 into the repair.
Good Luck if you try this out.
49 comments:
Great information, thanks. If you still have the 2 motors I'll take them. What model motor are they?
Thanks, Rosalind
Did you get my request for motors? It came back so I'm not sure if you got it. I would like to buy you 2 Stepper motors, what model # are they?
rosalind... Sorry it took me a while to get back with you, I was out of town and didn't have any internet access. The model number for the Stepper Motors is X25.168. That is the upgraded motor for the cluster. If you are still interested, email me at: station75@gmail.com and we can work out the payment and shipping.
how do i get the needles off the stepper motors i dont wanna pull on them to hard and damage anything
how do i get the needles of the step motors with out breaking them
how do i get the display of the circut bored the needles hold it in place (how do i get the needles off of the stepper motor)
Anonymous...
I went step by step through the entire process. It may help if you read through the entire post again, because I answer your questions in there.
I can understand your concern, but I can't tell you any more than what I wrote in my blog post.
If you are that concerned about breaking something, I would suggest that you pay to have someone fix your instrument cluster.
Good Luck!
Thanks so much for this information. Your detailed instructions saved me hundreds of dollars. I was easily able to replace the motors on my wife's cavalier. I greatly appreciate the time it took to put this together.
Jan B...
You're Welcome! Glad I could be of service.
AG
Thank you for such an informative and helpful post. I just finished replacing all 4 stepper motors in my girlfriend's 2003 Cavalier (though the tach was still working in hers, too...), as well the backlight bulb of the digital odometer which had been out for years. The bulb removal/replacement was a bit hairy, as I had to slightly bend the leads of the LCD readout to remove the bulb, but the dash disassembly, cluster removal, and motor replacement were a breeze thanks to your instructions. Thanks again.
Alex, I'm glad my write up came in handy to you.
AG
Great job! I just replaced the stepper motors in my brother's 2005 Cavalier. I didn't have any problem with the circuit board, as I am a retired Electrical Engineer with years of soldering experince! I got my stepper motors off eBay and apparently same vendor as you used, because the instructions were identical.
However, readers may want to read my comments on your "Dash Removal" blog re the couple extra steps which make dash removal much easier. Thanks again!
Thanks. I used your guide to replace burned out backlights. Number 2182 bulbs work perfectly. They are slightly larger but are the perfect brightness. I replaced all of them and discarded the white bases.
Thank you so much for posting this. It gave me the confidence I needed to do it my self and save a couple hundred of dollars. FYI Don't forget to put your mileage reset push stick in like I did.
Thank you, thank you. Just repaired my buddy's cluster with your help. GREAT POST!!!
I just did a search for them on Google and it came right up. I got 5 stepper motors for 20$ and had them shipped. Took me about an hour and a half to get it all done and back together. Works great. Buy the Desoldering tool it make it so much easier.
@ Ted...
Glad my posts helped you out. I agree, having the right tool for the job always makes it easier.
AG
Hello my name is jelyn, Sorry I pulled you email off of your blog u left for someone else. But I am having the same problems with gauges, I called the dealership and they said 380 to repair it something about the have to pull codes off of it then order the cluster then program my codes on the new clusters, but I just called to get the name of the part I need cause I was like how hard could it be to fix myself. But I was wondering what he was talking about with the codes?
Thanks for taking the time to help. I am just wondering if it is the same issue as what I have seen. 1st my temp gauge went out. I replaced sensor(no help). Then thought I might have to reset PCM so I remove bat terminal. (it worked) Now gauges are out. Tach & Speed. Possibly they are all related.
Main point is that they do work sometimes depending on start up of vehicle.
-Does this sound similar as Almost Gone or anyone else who had step motor fix their issue?
Thanks,
@ Grease
I'm pretty sure my son's gauges would move occasionally, but they didn't work properly.
All I can tell you is that the job isn't really hard and fairly inexpensive to do. If you try it and the problem still exists, at least you will know that your stepper motors aren't causing the problem.
Ultimately, it is your decision though. Good Luck with what you decide.
Let me know what happens.
AG
Hey AG, this was a great and very informative, i took my car in and they wanted 650 bucks for new cluster instrument, i picked one up for 40 bucks used, im gonna throw it in tommorrow with your instructions! thanks bud
Almost Gone
I am a mechanic and still really appreciated all the info in your blog. It came in really handy and saved me a lot of time. I went a little further with the dash removal, took out the def. vent and the 2 screws under the glove box that hold the last dash bracket in. With the dash removed, the cluster removal is a breeze. Took about 5 min more to get the whole dash out than just loosening it. Thanks so much for the info, took all the mystery out of it.
You just saved me $500 which the dealership was going to charge me. This was my very first solder job and it was a bit messy while I was learning to solder but everything came out perfect. Well other then the fuel and temp gauges cause I didn't mark the location and now they're one notch off. I'll fix it when I'm willing to get back in there. Thank you so much man!
Just a little braggin' rights here-I am a mechanically inclined WOMAN who accomplished this task by myself.
Make sure you do read Warrior Joe's comments on the dashboard removal. It took me awhile to get the dash apart.
Almost done, just need to get to the soldering part, but was so excited I had to post.
Thanks for for blog!!!!!!!!!!!
I am so grateful for stumbling upon this blog!! Would you consider this job to be easy, moderate or advanced? I'm thinking about having a friend do this repair for me before my inspection runs up!!
@ Anonymous...
For me the job was moderate while I was considering it, but turned to easy once I got into it. I would have to say the difficulty is up to the one doing the repair.
If your friend is a competent mechanic, it should be no problem for him. If he doesn't know his way around a vehicle, then it could be challenging. Hope this helps.
AG
Great blog! I also had issues with the instrument cluster so I purchased a used one and still have the same issue as before. No movement out of the speedometer needle. Could it be possible that 2 instrument clusters have the same problem or am I missing something else? Carl
@ Carl...
Yes, it is entirely possible that you have run into the same issue with both of the clusters. The original stepper motors put in the clusters were junk, that is why they came out with new ones.
AG
So, I dug a little deeper and since my instrument cluster is out of a 99 Cavalier the stepper motors are a little different. They are connected to the board with four posts, no solder. I switched the tach and the speedometer motor and the tach works so I know it isn't a motor problem. I have already changed the speed sensor so it is either in the microprocessor at the cluster or the wiring. Does this sound logical to you. I really appreciate your input.
Carl
@ Carl...
I wish I could help you more. I'm only familiar with what I've done on my son's car. Like I state on my blog profile, I'm not a professional mechanic, I'm just a retired Fireman.
When I have a problem with one of my vehicles, I research how to fix it and then do it. Since your issues are a bit different than what I've done, I can't really help you much. I can tell you though that what you've written seems logical to me.
Good Luck, I hope you're able to get it fixed to your satisfaction.
AG
@ Headlamp Bulbs...
For other GM vehicles it may be similar, but for other makes I have no idea. That's the best I can do for you.
AG
Wow - What a great help your instructions have been. We now have a fully functional Instrument cluster. Thanks a lot !!!
Thank you for the instructions. Guages on the cavalier now working again.
Thank you for the instructions. Very useful instructions.
Very useful! Thank you so much! I just replaced my stepper motors last night and it wasn't bad at all. I've never desoldered anything before and it was easy! Much appreciated!
Thx for your help!! I didnt want to try to replace this myself, it cost me 280 to get my mechanic to replace the whole board with a used one. Not the best way but meh, it seems to be working. EXCEPT the bulb is burnt out for my odometer! Any suggestions how to fix that??? Anyone??
@ chrissyo, when I did my repair, the bulbs were all working so we didn't mess with them. If you read a comment by Alex in this comment section, he did replace his while his cluster was out, which you would have to remove to do the job. Other than that, I can't help you much with the bulb replacement.
I just did this repair per your instructions and put back in car. everyone is working but the speedometer. I reset it back to its resting palce below zero, and it wont rise up in speed according to my gpd it just stays at zero but if i manually move the needle up to say the 25mph im driving at it will holdand when i decelerate, it will go down normally. but wont go back up. ideas?
@ Anonymous... Like I stated in my profile, I am not a professional mechanic. I enjoy working on cars and troubleshooting. Unfortunately, I can't help you with your problem. I would need the car to play with it to see if I could figure it out. The only things I can suggest is that you have an issue with the sending unit or sensor for the speedometer, or you got a bad stepper motor. Those are just guesses. I'm sure there are plenty of other things it could be. Good luck figuring it out.
Thanks for keeping this post online. I found some much needed information to replace a few bulbs on my 2003 Cavalier dash cluster. I had to replace the odometer backlight bulb and one of the tachometer bulbs.
A few notes regarding my experience (most of this will be obvious to those with experience, but I'm writing this to hopefully help my fellow novice):
-I didn't need to turn the gauge needles before popping them off, I just slid the fork under the base and gave it a go. The plastic sleeve of the gauge needle is pressure fitted on the metal needle of the stepper motor. If you're hesitant like I was, just go for it.
-If you have a bulb that's intermittently working, it's most likely a break in the filament (I was able to get the tach light working for a time by hitting the cluster when it went out). Replace the bulb with a new one.
-Like Alex did, I bent the odometer housing back far enough to gain access to the bulb. Once the new bulb was on the board, I had a rough time getting the housing back over the new bulb and ended up breaking some of the odometer solder joints on the board (you'll know you did this when you go to test it in the car and the odometer display is missing whole digits or parts of them. My odometer was doing this before I took it apart). I simply scraped away the clear coating and freshly soldered the joints.
Thanks again for all the information. It was immensely helpful!
Excellent write up. My problem was that I forgot to spin the needles before resetting them and now my fuel needle is on the tick mark to the left of the F, instead of just past it. Considering I was using my iphone as my speedometer for about 6 months, I still see this as a success.
Hi, I own a 2005 Cavalier and my instrument cluster has given me troubles for the past 2 years so I am now looking at replacing my stepper motors. Do you have any that I could purchase from you or do you know of a good place where I could order them? Also, is the model for the stepper motor X25.168? I've seen a lot of x27.168 but don't know if the x25 is what I need?? Thank you so much!! Clayton
Clayton, it appears that the X27.168 motors are the next upgrade that replaces the X25.168 motors. So, you should be OK buying them. I do have two left over from my repair if you want them. I'll sell them to you for $5 plus whatever it costs to ship. Let me know.
Awesome write-up on how to remove the dash, and then how to replace the stepper motors. Followed the step by step instructions and in about 2 hours all was done.
Thanks for a great write-up.
Chris from Halifax,
Thanks for the kind words, glad I could be of service.
Hey, just wanted to drop you a comment and say THANKS!! I've done quite a bit of work with electronics so monkeying with a circuit board was nothing new to me however, your very well written and detailed post cleared up any ambiguity I might have had. From start to finish I doubt it took me more than an hour to pull the dash apart and have it back in and good to go. Saved myself a good amount of money, total cost was $18 for the stepper motors off Ebay and I already had the rest of the equipment to begin with so $18 was a good deal for a $200 fix ( new cluster ). Keep it up and thanks again!
Thank you for your guide. It was very helpful. I did damage my dashboard a bit but I was able to successfully replace all the stepper motors. I found another problem with my gas meter though. Whenever I turn on my car, it's always Full no matter how much gas is in the tank. It's a totally separate issue, but it gives you an idea how crappy these cars are.
Almost Gone, you are the MAN!!! thank you for posting this. I know it has been a while since you did this, but I got a set of new stepper motors (newer updated part# x27.168) and just finished my wife's 04 cavalier cluster in about an hour and a half total. and between this post and the one on the dash removal and the amendment about the two gold screws in the glove box, nothing was left for guesswork. I am super appreciative of this and all folks who post helpful things like this for DIY'ers who are mechanically savvy and don't want to pay a million dollars for a simple fix. Thanks again.
I know this is an old blog post, but I felt compelled to leave a comment thanking you. It was surprisingly difficult to find a resource like yours. The pictures and explanation helped me immensely in gaining the courage to tear my cluster apart. Looking back it wasn't really all that bad, but it's much easier than jumping in blind. I'm kicking myself for procrastinating this fix for as long as I did. Thanks again!
Post a Comment