I really enjoy using the Internet. You can find all sorts of information about all kinds of things. I spent several hours surfing and searching for information on how to remove the dashboard on a 2005 Chevy Cavalier, but couldn't find a good step by step instruction on how to do it. Hence this blog entry.
The reason I wanted to know how to do it was so I could remove the Instrument Cluster to repair the Speedometer, Fuel and Temperature gauges on the car.
The car belongs to my son. We were talking one day and he said that his Speedometer had stopped working, along with the Fuel and Temp gauges.
One thing lead to another and I was on the Internet looking for fixes. I first came across some guys who talked about the "Stepper Motors" being bad. Apparently, GM used a very bad batch of these "Stepper Motors" in a whole bunch of cars, not just the Cavalier. I located some Speedometer Repair services on Ebay that offered their services for $90 and up. The $90 service was just to repair one Stepper Motor, if you wanted more done, it was at least $10 per motor more.
I kept on looking and found some decent "How to" sites that gave a bit of information on how to do the repair for yourself. I'm all into that (just read through more of my blog posts about my other adventures with my BMW's). So I decided to try and do this myself. I found a seller on Ebay that was selling the upgraded GM "Stepper Motors" for a decent price. I needed four to do the job... replacing the bad Speedometer, Fuel and Temp gauge and just so I wouldn't have to do it again, I would replace the Tachometer motor also, even though it was still working.
Once the Motors arrived, I had everything I needed, except for good instructions on how to get the Instrument Cluster out of the car. Now, there will be these instructions for you to use if you need to take yours apart.
The first thing you need to do is locate all of the screws that hold the top of the dash in place. Below are some pictures I took of their locations. Just follow the comments I put at the top of each picture.
I started by removing the end trim pieces of the dash.
This is the drivers side end. In the picture you can see the two yellow arrows, these are the trim pieces that just pry off. There is a screw in the green circle that has to be removed. The three red circles show the mounting points for the large trim piece. The small trim piece is actually the door to the fuse box.
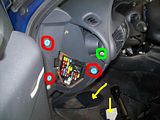
This next picture is the end on the passenger side of the car. The screw in the green circle needs to come off. The mounting spots for the trim on this side are those blue receptacles. The trim just pulls off.
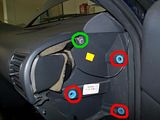
The next screws I removed came from the glove box area. Open the glove box and you will see two screws near the upper edge of the box, circled in green in the picture. You need to remove these.
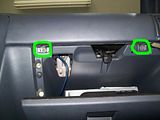
It's hard to get a full shot of the plastic bezel that you are removing to get to the cluster when it's still in the car. Here is a shot of it removed, so you can see what has to come out.
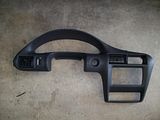
Just so you know, in the bezel picture, there are two plugs you have to disconnect to completely get it out of the car. If you look at near the center of the bezel you will see a small round hole, that is where the Cigarette lighter fits. There is a plug to it. There is a plug to the light dimmer switch also that has to be removed. Both plugs have little retaining clips you have to manipulate to unplug them.
There are still two more screws that you will need to remove before the bezel can come out. These two screws are located on either side of the Instrument Cluster on the top. In the pictures you can see their locations. The one on the right side is a bit of a bear to get out.
This is the left side of the bezel. The screw is located inside where I drew the red circle (the other circles will be explained later). This screw installs from the top, so you have to make sure that the other screws and clips are loose so you can get to this one.
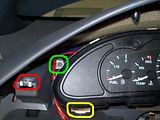
This is the right side of the bezel. The screw is located where I drew the red circle (same thing about the other circles). This screw also installs from the top. I would suggest that this be the last screw you remove, since it's the hardest to get to.
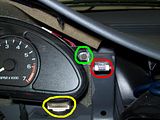
All of these screws use a 7mm socket. The rest of the bezel is just pried off. I used two different sized putty knives to do the prying. You have to pry up around the cluster to get to the last two screws. These two pics show the clips (same clips, just different camera angles) that need to come out to get to the screws (green circles).
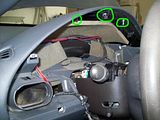
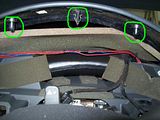
By getting these clips released and up, it makes it much easier to get to the screws. Just make sure to remove the other screws first.
These pictures give you an idea of where the clips are located along the whole bezel.
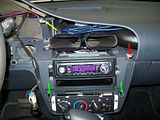
This picture shows the area around the radio and climate control unit. The red arrow is a clip that was a bit difficult to see even with everything else loose. I put a screwdriver in behind the bezel at that point and pried outward and it finally released. The two green arrows are clips that released fairly easy. The yellow arrow points to the location of the last screw on the right side of the Cluster.
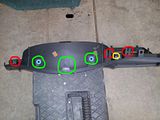
This picture shows all of the various clips, mounting points and screw positions on top of the bezel from the top. All of the circled parts are involved in securing it to the dash.
Once all of the clips and screw are out or released, you only have one more thing to do to get the bezel out. You need to remove the top plastic cover to the steering wheel. If you look between your steering wheel and the bezel, there is a plastic cover where the "Emergency Flasher" button sticks out. This is a two piece cover that is split down the side so it can be removed if necessary. Find the joint where it connects and use one of your putty knives to open it, sort of like a clam. It popped right open with very little pressure on my son's car. Pull the top off and you should then be able to get the bezel out. You have to sort of finesse it out, but it does come out. Make sure you remove the two plugs for the Cig Lighter and Dimmer switch.
That takes care of removing the bezel. This next part is a bit easier and only takes a few minutes.
There are two screws that hold the Cluster in place. Here are those two pictures from before that I said I would explain about the other circles. The green circles show the location of the screws that need to be removed to get the Cluster out. The yellow circles show the mounting points on the bottom of the cluster. If you look closely, you can see two white pieces that are nipples on the Cluster that locate the Cluster in the opening of the bezel. The nipples fit in holes in the dash.


Prior to removing the Cluster I removed the fuses for the Instrument Cluster and the Air Bags, just to make sure I didn't short something out. Make sure you put them back it once you have everything put back together.
Once the screws are removed, you can tilt the top of the Cluster towards you and it will start to come out. Manipulate it a bit and you can get the nipples out of the holes. Once it's clear, you just have to unclip the plug to the Cluster that is located at the center/top of the Cluster.
That does it for this part. I will blog another post soon about the actual repair of the cluster.
12 comments:
You are one of the greats..... Thank you, my friend.
Finally! I found someone that helps me repair this ongoing problem.
Many Thanks.
Great job! I used your information to change the stepping motors in my brother's 2005 Cavalier. Could not have done it without you! However, in my dash removal process, I made the following modification to your procedures which made the job much easier:
1) In the glove box, there are THREE black screws at the top of the glove box that have to be removed - not two.
2) Remove the 2 brass screws in the opening at top of glve box that hold the top dash cover on (use an extension on the 7mm socket and be VERY careful not to drop the screws!)
3) Remove the vent cover on top of the dash (1 phillips screw), prise it off with a screwdriver, and remove the two black 7mm screws. Then the WHOLE top of the dash cover can be removed, providing unobstructed access to the screws at right side of instrument cluster that you had a problem with (your situation involved a clip - mine was a SCREW!). I first prised the whole screw/clip assembly out but fortunately did not damage the attachment too much, and was able to put the screw back in after removing the top as described. Many thanks again for your post! All went well and instruments centered perfectly and speedo was dead on.
Also I changed all the indicator lamps as well since I had the dash out, even though the original ones were OK. Joe
Joe, thanks for the comments. I hope those looking to fix their cluster read your updates!
Almost Gone,
i have the same issue with my 2004
do you still have the two (Stepper Motors) if you do let me know I also need two more but i don't know where to get them... Please help
My email is CLRivest@aol.com
or you can txt me At 413-885-5137
thanks
Cary
You saved me from a less-than-honest mechanic. These $5-$7 stepper motors, he was telling me $250 just for the part. I know with your instructions and Joe's addendum, I can knock this out myself. Thank You!, Paul
Almost Gone, will i trigger an anti-teft or security system by removing the dash/clusters on my Cavalier? I think i've waited long enough driving around with all tree clusters bad. You blog is so detailed that i think i can do this myself. Thank you so much
@ Anonymous...
I don't think you would trigger an alarm, but I'm not familiar with that. My son's car didn't have an alarm, so I didn't have to deal with it. You may want to disconnect the alarm or pull the fuse for it before you start.
Sorry I couldn't be any more help. Good Luck with your repair!
AG
WAY TO GO THANKS FOR ALL PICS VIDEOS AND YOUR SPECIAL ATTENTION TO DETAIL..THIS IS THE SECOND SET OF STEPPER I HAV REPLACED ON A GM PRODUCT...THIS ONE WENT MUCH EASIER THANKS GLENN NOVA SCOTIA CANADA..
Glenn, thanks for your kind comments, glad I could be of help.
Other than cracking the dash face trying to remove that last screw, I did this with no problems. I hadn't read the comment about removing all of the glove box screws. Guess I should have. At least my daughter has her speedometer functional again at a fraction of the cost. Thank-you for the great instructions and photos!
Thank you so much for the info, though I found a helpful little extra in my Haynes manual. When taking the screws out of the glove box, look up inside the glove box through a hole and you'll see 2 gold colored bolts side by side in a metal bracket. Those hold the passenger side airbag to the dash, and removing them allows you to take the entire upper dash off, instead of trying to work around it. This is on my 2004 Cavalier.
Post a Comment