skip to main |
skip to sidebar
On Monday, December 1st, I started working on getting the timing cover off so I could get the broken chain guide out. It was actually pretty easy. I followed the Bentley manual pretty much, except for one part. It said that you had to drop the oil pan to be able to get the timing cover off. I removed the four bolts that go from the oil pan into the bottom of the timing cover and it came off without the oil pan dropping.I thought that while I was down there that I would just drop the oil pan and replace the gasket since there is possibly a small leak coming from the pan gasket. After reading through the Bentley manual, it didn't seem to be a major job, WRONG! After about an hour, I only had about two thirds of the bolts removed. The other ones were nearly impossible to get to, at least with my limited tool cache. Looking at the pan, there was no way that it would come out like explained in the Bentley. I got on the internet and found that it isn't quite as simple as Bentley made it sound. It looks like you either have to lift the entire motor, or remove much of the front suspension and tie rods, etc to get the pan out. I decided to put that job on hold and put all of the bolts back in except for the ones that came out of the timing cover.In removing the timing cover, you also have to remove the crankshaft bolt which holds on the vibration damper and the main belt pulley. That thing is torqued to 300 ft. lbs. Bentley says you need a special tool for holding the pulley still while you remove the bolt. I didn't have that tool, so I thought that the TDC pin that is locked into the flywheel I installed would probably keep the motor from turning and it worked great. I was even able to get the pin out and it didn't look any worse for the wear.Once the timing cover was off, I removed the broken chain guide, along with the timing chain tensioning guide and the timing chain itself. In the picture below, you can see the broken guide and the larger tensioning guide. I ordered both new guides along with a bunch of other stuff I've noticed that was pretty worn out as I tore everything apart.The picture below is the timing chain area where it attaches to the crank shaft with everything removed.
 Once I had figured the oil pan gasket was a no go, at least for now, I decided to clean up the head mating surface on the block and clean up the tops of the pistons. I used a small wire brush on my dremel tool and a bit of fine sandpaper to remove a bunch of build up on the block (don't worry, I made sure none of the debris fell into the cylinders). I used some Berryman's Carburetor cleaner to clean the carbon deposits on the tops of the pistons. It worked very well with just a rag and the cleaner, see for yourself...(compare it to the pictures from part two of this series)
I missed a couple of steps on Thanksgiving when I started tearing the head down. I forgot to disconnect the exhaust from the head, so I started with that today. It took me a good amount of time to do it since you have to remove 24 nuts that hold the manifold to the head. Most of the nuts came out with the studs, all except for two of them. I also had to remove the six nuts from where the headers connect to the exhaust pipes, it made it much easier to get the headers off.The rest of the way, I made sure to follow the Bentley's Manual step by step. Everything went pretty well.One of the things I've done that I've never done before was take great care in documenting and labeling where everything goes. Last time I took the Intake Manifold off of the 93 525i, I mixed up the fuel lines when I put it back together and it wouldn't start. It took me about an hour to figure out what I did. Hopefully the extra time I took to mark everything will relieve me from having to spend time troubleshooting a problem.There wasn't a whole lot of stuff to take pictures of until I pulled the head off, so I will put a couple of pictures at the end of this post. Over the summer, I purchased all of the special BMW tools you need to do a head gasket replacement. You really do need them if you want to do the job right without breaking anything. I used the tools at the appropriate times and everything came apart as it should have. Once I had all of the head bolts out, I was ready to take the head off. I gave it a little tug, nothing. I tapped it a couple of times with a rubber mallet and tried again, it moved. I grabbed it on both ends and the front came up first and then the rear. I didn't have my body positioned like I should have, so I set it down to reposition my feet. I then pulled up and it came out. Once I had it off the block, I balanced the head on the inside of the fender well so I could fish the timing chain through the head to finish getting it out of the engine compartment. I took it over and put it with all the other parts on my work bench. It is heavier than it looks.Once the head was off, I looked to see where the gasket had failed. I found a spot on the exhaust side right between the #3 and #4 cylinders. I didn't see a break, but you could tell it had been leaking there. Inside of the the exhaust header for the #3 cylinder, you could see that it was sort of greasy looking. The water must have been going through that cylinder. I remember when I was having the problem earlier in the year I pulled the spark plugs and the #3 cylinder plug was discolored, so I'm pretty sure that was where the problem is.
 This picture shows the head off of the block.
 This is a close up of the area where I believe the leak to be in the head gasket. The spot is directly below the middle cylinder, right in the middle of the picture.
 This is just a picture of all the stuff I've taken off the car. I had some old pieces of pressboard left over from some project I did a while back, so I cleared off my work bench and put the pressboard on top of it. As I removed the parts, I put them there and wrote directly on the pressboard where it came from. I think it will work well, there are a lot of small parts, nuts, bolts, you know. I've documented pretty well I think.One thing did happen that I didn't plan on, probably cost me an extra $150 and several hours of time. When I was trying to pull the head off, I must have caught the primary chain tensioner guide and broke the leading edge off of it. Actually I'm glad I found it. It could have been very easy to not find it and put everything back together. Anyway, to replace the guide, you have to remove the timing chain cover. To remove the cover you have to remove the crankshaft pulley, all of the belts, two belt pulleys, one tensioner and you have to drop the oil pan. I will tackle the oil pan and then the timing cover on Monday.
 This picture is what it looked like before I started disassembling everything that needed to come off to get the head off.
 This next picture is from the same angle, but I've removed a few things. Namely, the Air Filter box, the boot to the Throttle Body, the radiator hoses, most of the vacuum lines, coolant lines, etc. to the Intake Manifold and Throttle Body. Also removed are the throttle cables.
 This picture shows that I've removed even more stuff. The entire Intake Manifold is now off. I've also removed the Head Cover, you can tell by looking on the left side of the picture (you can see some of the timing chains and the VANOS).
 This picture is taken from the other side of the car. It shows the top of the head with the Head (valve) cover removed. Also gone now is the black plastic cover that goes over the intake camshaft.
I didn't take any pictures of this, but I also removed the VANOS. When I got to this point, I decided to quit for the day. I did all of this on Thanksgiving Day. Just so you know, if you want to see a bigger picture, all you have to do is click on the smaller one.
The 95 525i has a blown head gasket. It actually happened earlier in the year, somewhere around the end of April. I tried three different "Head Gasket Fix" in a can products to try and fix it. The first two did nothing, the last one actually sealed it up for about five months. Got me through the summer.Last Sunday, Nov. 23, I got home from work late and decided to drive the 95 to Church to meet up with the rest of the family. I knew the gasket was blown when I started it up. Really rough idle with steam blowing out of the exhaust pipe. I drove it anyway. When church was over, the car started OK, idled rough for a bit but smoothed out. The distance from Church to home is about 2.5 miles. I got stopped at a light on the way home and while I was sitting there, the temperature gauge started rising. It went up to the 3/4 hot mark before I could move. When the light changed, I punched it and it went right to the 7/8 mark. I kept going and it hit the red zone just as I pulled into my driveway. I immediately shut the car off and let it sit for about 4 hours before I moved it into the garage where it is still sitting as I work on pulling the head off.Yesterday, I stripped off most of what needs to come off to get the head off. Tomorrow, I plan on getting the head pulled off. I have some pictures and will post them in a series of blog entries documenting the process. I have a remanufactured Head ordered and on the way to my house. I've also ordered most of the other stuff I need to complete the job.I'm taking a trip to Philadelphia with my brother to see the Army - Navy Football game next Saturday, so I won't be able to put the new head on until I get back in about a week and a half. All of the parts I'm ordering should be here by then, so I won't have to wait for anything to arrive once I get started putting it back together.
I decided recently to replace my perfectly good stereo in my 2003 Expedition. I have put new radios in both of the BMW's I've purchased recently and sort of like the ability to play a CD with upwards of a couple of hundred songs on it. The radio in the Expedition was able to play only Audio CD's and Tapes, no MP3's.
I ordered the radio from Crutchfield. I've had excellent service from them in the past and did again, except for one little thing. The kit they send to adapt the stereo to the opening had a broken tab on it that is used for mounting the radio to the chassis. I didn't want to wait for a replacement, I know that Crutchfield would have sent me one, so I fabricated one out of a piece of sheet metal. It seems to have worked OK.
 You can see in this picture where I fabricated the tab out of sheet metal (lower left).
Crutchfield sends you all the instructions you need to remove the old and install the new stereo. For the first time, the instructions were a bit confusing to me. I had to call their tech support twice during the install. Once to clarify how to wire the plug to the new stereo into the wiring adapter. I followed their instructions and found that my unit was a bit different. After another call, they helped me figure out that I only needed one of the plugs that came out of the old radio, apparently the second plug was for a CD changer that I didn't have in my car.
It took me a bit longer than I expected to do the install, but in the end it all worked out good. The only thing that I need to fix is the tab I fabricated needs to be modified. The radio is sitting just a little crooked in the opening. It isn't that noticeable, but it will bug me until I fix it.
Here is a picture of it installed, you can see it is a little higher on the left side.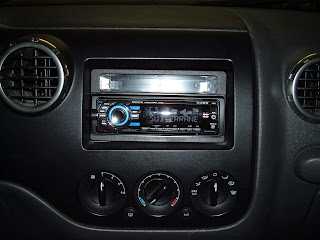
I have some time now, thought I'd tell the story of towing the 93 525i home from where I bought it.Just to recap, the car ran when I bought it, but it had a bad water pump, so you couldn't run it too long before it would overheat. I figured that I could tow it home since AAA told me that the only way they would tow it is if it was an emergency roadside call. Being the honest guy that I am, I didn't want to lie about it, so my only other option was to pay for a tow or rent a car hauler on my own and do it myself.Where I bought the car was about 100 miles one way from my house. Paying to have someone tow it home would have been very costly, I didn't even check into it. The do it yourself route was my only real option. I called around and found a place that would actually let me rent a car hauler. Many places wouldn't let me because I have a half ton chassis on my Expedition. Most wanted a 3/4 ton chassis to tow. I found this place in Hesperia that said if I brought my vehicle down, they would inspect it and let me know if I could rent from them. I went there and since I had a factory tow hitch installed rated way over what the trailer and car weighed in at, they agreed to let me rent the trailer. I made an appointment to pick up the trailer the next Tuesday which was three days away.Tuesday arrives, I take care of the stuff I need to during the day and then about Two in the afternoon, I go down and pick up the trailer along with a spare (since I'm going over 75 miles one way) and the binder chains to tie the car down with. I had decided to do this in the evening/night time hours so I wouldn't hit so much traffic going through LA. The freeways I would be traveling were the 15, 210, 134 and 101.I leave home about 5:30pm hoping I can get there before it gets too dark. The ride there goes alright, but the trailer bounces all over the place when there is no weight on it. Couldn't travel more than about 60 most of the way to keep it from bouncing all over the place. I get to the guys house a little before 7:30pm. I'm starting to lose light, so I get out the light I brought with me, man I'm glad I had that as you will see in a bit.The trailer is pretty high, and the BMW is pretty low to the ground. As we are trying to drive the car up on the trailer, it gets high centered on the end of the trailer right about in the middle of the car. I'm thinking of what I can do to reduce the angle and figure if I crank up the wheel on the trailer tongue it might just give me enough room to clear the part I'm hitting. Luckily it works, the car is on the trailer. It's almost dark now. I still have to secure the car to the trailer for transport, only problem is the front of the car is so low I can't get under it to find a spot to hook the chain. I didn't know if the car had a tire jack with it or not, I hadn't checked. I asked the guy I bought if from if it had one and he said he thought it did, so we checked and it did. I used it to jack of the front right side of the car and was able to get the chain secured so I couldn't tighten the binders. The back wasn't hard to get to, there was more room so that went pretty well. I finally take care of signing the rest of the paperwork and give the guy the rest of the money and start on my way home about 8:15. Knowing that you need to check the binders after a short period of time to make sure they are holding, I stop about a mile down the road, before I got back on the Freeway. Good thing I did, because both chains were almost completely loose. So another 15 minutes worth of tightening and sweating and I'm off again.It's completely dark now. I have to make several freeway changes in the first 15 or so miles of the trip home. I get in the slow lane to make the transitions easier and to go slow. I'm dreading this drive since the binders came off so easy in a mile to start. I'm driving down the freeway not paying as much attention as I should be to my GPS when I realize I'm about to go a way I'm not supposed to go. I check real quick and make a very swift merge to the left, fearing that the car will just fall off the trailer, that it will run into numerous cars killing untold millions of people. Once I finished the merge, I peaked in my rear view mirror expecting to see the car gone, but it was still there.I just keep plugging away, the entire time expecting the car to just roll off the trailer at any minute. I had planned to stop somewhere along the way again to check the chain binders, but was afraid of what I might find, not really, but I didn't want to stop somewhere I didn't know the area, so I kept going. I finally decided to stop at the park next to the Fire Station I work at. It's a little more than halfway home. There is a nice big parking lot there and the lights stay on until about 10pm most nights. I pull in to the parking lot a little before 10 and find, surprise, the binders were completely loose again. So bad in fact that the front one had fallen off completely. I don't know how the car was still on the trailer. It had moved over quite a bit to the right side of the trailer. So I spend another 20 minutes putting the binders back on and sweating again. I take off on the final leg of the journey and just before I hop on the 15, I stop one more time and find the binders loose again. I crank them down one more time, cross my fingers and start up the pass to home. I stayed in the slow lane all the way until I got off the freeway. I got off a bit earlier than I would normally, I just wanted off the freeway. I took side streets all the way home and finally pulled in around 11:30pm.I am exhausted, mainly because of the stress of wondering if the car was going to do an escape act while on the trailer. I spent more time looking in the rear view mirror than I did looking out of the windshield. I locked everything up and left the car on the trailer until the next morning.The next morning I get up and prepare to get the car off the trailer. Since I had trouble getting it on the trailer, I figured if I raised the bottom of the ramp with some wood blocks it would reduce the angle and the car wouldn't high center again. I did what I thought and it worked like a charm.Put the car in the garage to store it. Got everything together and took the trailer back to the rental place. It only cost about $85 for the rental, but I think I used up about 10 years of my life on stress the night before.One thing I learned is to not buy cars that don't run so far from home. Another thing is to make sure you know how to make things work. I thought I knew how to use those binders, but must not have known enough. If I did this again, I would use heavy duty tie down straps instead of chains.
I was looking at the BMW listings on craigslist back in mid July and found a 93 525i that appeared to be in not too bad of shape that was listed for sale at $1500. The guy said it ran well, but that it had a bad water pump on it. He also said that it had a problem with the power seats not working right.
After working on the 95 525i and knowing that changing a bad water pump wasn't any big deal, I called the guy and went and looked at it. Other than the water pump the only thing I noticed was that it had a major oil leak that was coming from a bad valve cover gasket, it was pretty obvious. It definitely needed some work, but I thought it had potential. In California, it is the responsibility of the seller to provide a current (within 90 days) smog certificate. This guy had no idea, and I thought that I could take care of it so I told him that if he took off a hundred bucks, I'd buy the car, he jumped on the offer. As you will see later in the story this was not such a good call on my part.
The interior of the car was in pretty good shape, other than the common BMW seat twist problem. Everything seemed to work, except there were a few burned out bulbs in the dash area. Since the water pump was trash, there was no way I could drive it home, so I made arrangements to rent a car hauling trailer and tow it home. I will write another post about this experience later. It deserves more time than the bit I would give it here.
So, I get the car home, barely. I order the parts I know it needs right away and wait for them to arrive. While I'm waiting, I take everything apart that I'm going to replace. I buy my parts mainly from Autohausaz.com. Their shipping is quick (and free if you purchase at least $50 worth of parts) and by far they have the best prices that I've been able to find.
The first batch of parts show up and I put them on. New water pump, new thermostat and housing, new belts, new radiator hoses, new air filter, new ac filter, new spark plugs and connectors, new valve cover gasket, spark plug gasket and grommets, new breather hose (from MAF to TB), new fuel filter.
Once I had all of those parts installed, I started the car and found what I thought was a bad pulley on one of the belt tensioners. I was getting a brake pad sensor warning along with a F/FOGLIGHT warning and a Coolant Level warning. I also plugged in my code reader and found that I had a bad knock/ping sensor (4-6 cylinders) and a bad coolant temperature sensor. So back to the parts ordering. Since I knew what it takes to do the knock sensors, I ordered two knock sensors, intake manifold gaskets, TB gasket, new coolant temperature sensor, new front and rear brake pads, new front and rear rotors and new brake pad wear sensors.
When these parts showed up, I put them on. It didn't take me quite as long this time to replace the knock sensors as it did the first time on the 95 525. Anyway, that gets done and while doing so, I bumped up against the brake fluid reservoir, and I heard a crack and all of a sudden I'm leaking brake fluid all over the floor, not a fast leak, but steady. So I go inside, find a reservoir at autohaus and order it along with the two rubber grommets that the reservoir mounts on. So, while waiting for the reservoir to arrive, I figure what the heck, I'll remove the reservoir and get a head start. So, I find that the reservoir wasn't broke, just the grommets were basically eaten away. I pull the reservoir off, clean it up and leave it off. I plugged the two holes in the master cylinder and waited for the grommets to arrive. The next day I'm home, they had arrived and I replace the grommets and have my wife and son help me to flush the brake fluid in the system. To do that you pump the brake pedal with the engine off and do so about 10 times per wheel starting on the right rear wheel, then the left rear, then the right front and then the left front. It was amazing how dirty the old fluid was in the system. It has new clean fluid now.
So when we get the fluid flushed and bled, I'm going to start working on the brakes since they're shot. I get in the car and turn the ignition key and it just spins in the slot. The only thing that happens is that the "Key in Ignition" warning on the LCD dislay is showing. Wonderful...
Well, I wanted to finish up the brakes, change all the rotors and pads and put on the new pad wear sensors. Once I'm done, I turn my attention to the ignition key problem.
So I go check in the Bentley's manual on what might be wrong. All I can find is how to take the ignition key cylinder out of the steering column. I follow the instructions on how to remove it and nothing happens. I keep trying and trying and nothing. You are supposed to be able to stick a piece of stiff wire in a small hole on the side of the cylinder, push and the cylinder just slides out. For me it wasn't happening. I just kept at it and after a couple of hours of trying different things it finally pops out in my hand. I later find that for a car that old you have pretty much won the lottery if you can get the cylinder out without breaking it, I guess I will never win the lottery now since I used up all my luck on the cylinder. So, once it's out I look inside the hole where it fits and see that there is some metal parts broken inside, GREAT...
I do some more searching on the internet and find that what is broken is the ignition lock housing/steering lock housing. This thing costs $121. To get to it, you have to completely dissassemble the steering wheel/steering column and cover. Also you have to remove most of the covers and shields at the drivers feet covering all of the wiring under the dash. So, I start taking things apart, amazingly things come apart way easier than I thought they would. After about an hour I've got things down to where I can tell where the housing actually is. To get it out is fairly simple except for one thing, there are two security bolts that are installed that have no type of slot or hex head to get a screwdriver or wrench on. They are called fracture bolts that have an external torx head on them that are cut off once installed. So, back to the internet. I found a post on a message board that was extremely helpful to me, otherwise it probably would have gone to a repair shop to complete the job. Regretfully, I can't find the site now, I will keep looking to see if I can put a link here. I will try to list the steps from memory since I did it almost two months ago. Once you get down to the housing, you need to remove the ignition switch, that is covered in the Bentley manual. I'd already removed the lock cylinder, so I start to take off everything that has to come off to get the housing out. The steering wheel has to come off, so I look up in Bentley's how to do that and follow the instructions, just make sure you disconnect the battery before trying to take off the steering wheel or you may activate the airbag, which you don't want to do. So, I finally get to the point where I can work on the fracture/security bolts. The website I found said that the way he got them out was to take a dremmel tool with a cutoff wheel and cut slots in the top of the bolts. So I try it and it worked great... on one of them. The other did not want to come out. I tried and tried, but nothing. Apparently the way they get these bolts out at the shop is they break them somehow, so I try pounding on it with a hammer and screwdriver but it won't budge. After doing that for about 20 minutes, I'm ready to give up. I try one more time to unscrew it with a screwdriver and it comes right out, what luck!!!
So, I remove the housing and get everything ready to put back together when the new housing arrives. It arrives in a couple of days and I put everything back together and it works like new. I even put new fracture bolts in, but I left the external torx on them instead of removing them just in case I ever have to work on it again.
I've done quite a bit of work on the car and may have some of this stuff out of order, but it's pretty close to what I've done.
So, I'm having a problem with a LCD message "Brake Lt. Circuit". I'm thinking it's a bad bulb, so I check and find the left brake light bulb is out, I replace it, still getting the message. I remember that there is the third center brake light and find out how to get to it and replace it. It works one time and then nothing, all of the brake lights don't work. I'm still getting the same message and no lights now. I go back to the internet and look for a solution. I'm reading a lot about the "LKM" or Light Control Module. This is the main control for the lighting on the car to put it simply. Sometimes the circuit board gets a bad solder joint and can be a cause for the "Brake Lt. Circuit" message. Luckily for me it ended up being the brake light switch being burned out. Too bad I didn't know about it when I had the lower dash area apart working on the ignition housing because that switch goes down there at the brake pedal. Once I put it in the brake lights worked fine.
So finally, I can drive the car to see if it works OK. The brakes work, the car runs, it doesn't overheat, but I still have a noise that sounds like a diesel engine running. I get my mechanics stethoscope out and try listening to everything that's turning on the motor. It's so noisy that I can't really tell. I had already replaced all of the pulleys, so they weren't causing the noise. I started thinking about the noise and remembered that a bad VANOS made a noise similar to what I was hearing. I read up on it a bit and decided that was my problem. I found this website called Dr. Vanos. They rebuild the VANOS units and sell them for way cheaper than you can get anywhere else, so I order one. It comes, I put it on and the noise is still there, GREAT...
So, I get the stethoscope out again and listen much more carefully. I find that the tensioner shock on the water pump/alternator side has worn an oblong hole in its mount and is really loose. I order a new one and replace it. It quiets the noise down a lot, but doesn't get rid of it all. Since most of the noise is gone now, I can hear better with the stethoscope and find that I have a bad bearing on the alternator. I order a new/rebuilt one and put it on and now it runs smooth as silk with no weird noises.
The motor actually runs really well considering the shape everything was in when I got it. I was fearing the worst when I couldn't pinpoint where the noise was coming from.
At this point in time, I haven't been able to run it too long, so I drive it around a bit and smoke is pouring from under the hood. I can smell it and know it's from all of the oil that leaked on and around the exhaust manifold from the really leaky valve cover gasket.
So, I'm finally to the point where I can get it tested for smog compliance. I take it in to the Test Station and it fails, miserably. It had really high CO and NOX. I ask the guy at the Testing place what could cause that and he gives me the run around about how BMW's are such highly technical cars that he couldn't even begin to guess. So I ask him a hypothetical question if this wasn't a BMW what would you suspect, he tells me the Catalytic Converter. He gives me the name of a repair shop who he said does excellent work on BMW's. I call them and they tell me the same thing, that it's more than likely the Cats. They give me a quote of $1200 to fix the car. I said I'd have to think about it.
I start looking on the internet for Catalytic Converters and find a "Direct Fit" replacement sold on ebay and made by CATCO. The price is nearly half of what it would cost to buy one through autohaus. I order it and it arrives about 10 days later. I pull the exhaust system out of the car and try and hook up the supposedly "Direct Fit" replacement and it doesn't even come close to fitting. I call CATCO up twice and talk to their engineering department and finally was told that I should just return the Cat to whoever I bought it through.
I contact the company and talk to the customer service department. They have outsourced this to India I'm pretty sure because they all have very thick accents and I'm having a hard time understanding them. I tell them the whole story and finally get them to send me an RMA # so I can send it back. They tell me that I have to send it back in the original packaging. I tell them that the box that it was sent it was nearly destroyed when they shipped it to me. They were adamant that it be sent back in the same box, so I asked if I could patch it up using other cardboard, and they said I could. When I finally got the RMA authorization it told me that the original box had to be intact and that I could use no tape on the outside of the box. I had already prepared the box by making several patches and used tons of tape to secure them. I called CATCO to find out if it would be a problem since they had shipped to me directly from their warehouse. The person I talked to told me it wouldn't be a problem, so I sent it back. I'm currently waiting for a credit to my credit card, I'm preparing for a battle to get my money back, I doubt this will end easily. (Update: Had no issue getting my money back, once it arrived back at CATCO, the company refunded promptly. I was happy to say the least!)
Anyway, when I took the exhaust out of the car, I noticed that the heat shield protecting the drive shaft was a bit mangled. I figured that while I had it apart, I would remove the shield and try and straighten it out a bit. I'm glad I did, because I found that the flex disc and the center support bearing were bad. The flex disc would have lasted a while longer, but had several cracks in it. The center support bearing was nearly torn through all of the rubber bearing holder. That must have been why I was getting a "wump, wump, wump" noise when I would start from a stop. The drive shaft was sort of just flopping around until it got spinning good. So, I ordered a new flex disc and center support bearing. I followed the instructions I found in Bentley and on the BMWe34 website. It is fairly simple if you take your time.
While I'm waiting for the disc and bearing, I start calling around and find that I can get the Cats installed with new mufflers at a good Muffler shop for $450. When I dropped the exhaust system to put on the other Cat, I found that the OEM muffler was shot too. I went ahead and put everything back together, the flex disc, the center support bearing, straightened the heat shield and put the exhaust system back in. I drive it over to the muffler shop the next morning and drop it off. I pick it up later in the afternoon and it's all done, ready to be smogged.
Before I take it back for the retest, I take it on the freeway and get everything nice and hot. I had put in some Chevron Techron to help with the Fuel System on a recommendation of this old guy I know who has been a mechanic for over 60 years, I respect his opinion. I get to the Test place and it passes with Flying Colors. I can finally register it after almost two months of working on it. It is finally legal to drive.
As you can see, my decision to buy the car without having the previous owner smog it was a big mistake. I'm guessing that it cost me over $500 to get it smogged.
Now that it's running, I had a couple of other things that needed to be done. I replaced the transmission fluid and the filter. I couldn't believe how dirty the fluid was and the filter was black. There is a magnet in the bottom of the main pan that attracts any metal shavings or pieces to keep them from circulating in the transmission. It was about three times it's normal size with all the small metal bits and dirt mixed up that were stuck to it. It seems to shift much smoother now that it's got a clean filter and clean fluid.
I also replaced the shocks and struts on the car along with the control arms and thrust arms and new front sway bar links. I nearly killed myself when doing the first front strut. I got ahead of myself and spun off the main bolt that holds everything together with my impact wrench before I put my spring compressors on. I was shocked to find my arm flying up in the air and the impact wrench being thrown out of my hand. Parts went everywhere. All I can say is that I'm lucky my head wasn't over the top of the strut when it let loose. Luckily, I wasn't hurt, nothing was broken and I didn't lose any of the parts. I did the rest of the struts/shocks/control arms/thrust arms/sway bar links much more cautiously and everything went as planned. The car rides so much nicer now. No more feeling like you just got off of a boat on a rough sea.
That is where I'm at now. I've actually done much more to this car than I've written about, much of it just small jobs. It really isn't much to look at, but should be a safe vehicle to drive for me and my kids for the next couple of years. To tell you the truth, for the most part, I really enjoyed working on it and I learned a lot about the car.


