I can't complain too much though, I got it for a fair price and it really does run great and everything on it works.
Since it was out on dirt roads much of the time, dust got everywhere. The instrument cluster had a nice layer of fine dust covering the inside of the bezel and on the gauges.
Removal of the cluster is actually quite simple. If you have a repair manual, I'm sure that they cover how to do it in there. I bought a Haynes manual at my local auto parts place. It tells you how to remove the cluster in there. Only problem is that the pictures are small, black and white and very low resolution. Hopefully the color pictures I will add here can help you out if you need to remove your cluster for any reason.
Here is how you do it: First off, you need to remove the bezel that covers all of the components of the dash. These first couple of pics show you what comes off. It's pretty simple, it just clips on the truck, no screws to remove or find.

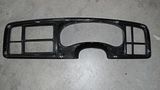
Somewhere around the edge of this bezel, you just need to grab hold of it and pull towards you. I would suggest doing it a bit gingerly, don't get overly aggressive with it. It you are careful, it should come out fairly easy. To make getting it out easier, you need to do a couple of things. First, tilt the steering wheel down as far as it will go. Second, if you have an automatic transmission, shift the gear selector all the way down to the lowest gear. You have to put the key in the ignition and turn it to be able to move the selector. I would suggest that you disconnect the battery so you don't short anything out while removing the cluster. Better to be safe than sorry. As you are moving the bezel away from the dash, you have to manipulate it a bit to get it to clear the hazard light button, but it will get past it with no problem.
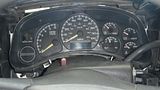
Once you have the bezel off, you can work on removing the cluster. There are four 7mm bolt/screws that hold the cluster in place. They are located one at each corner of the cluster. Here are some pictures showing where, with the cluster in and out.
This picture shows the cluster still in place, couldn't get a picture with the cluster in showing all four screw locations, there is one in the lower right corner not visible.
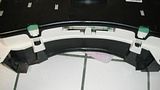
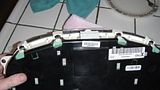
This picture shows the cluster removed and the locations of the screws:
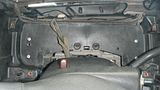
Once you have the cluster loose, you need to pull it out a bit and remove the wiring harness from the top of the cluster. It can be a little sticky, just take your time and don't force it. There are a couple of clips that lock it into place that you have to squeeze to release it from the receptacle.
I thought that I got a picture of the wiring harness, but apparently I didn't. I did take a picture of the receptacle for the harness on the top of the cluster, here it is:

These last pics are of the clips that hold the clear plastic lens over the actual cluster.
These two are on the bottom of the cluster, if you're not sure, you can see two small black tabs sticking out from white square shapes. (I normally draw lines pointing to what I'm describing, but my photo hosting site changed the way they do things and I haven't figured it out yet.)
This picture is of the top of the cluster and the four tabs that hold the clear plastic cover on the cluster. They look like the bottom tabs:
Once you get the cluster opened up, you can clean it however you like. Just be careful around the gauge needles. If you're going to use some type of liquid cleaner, don't spray it directly on the cluster, spray it on a rag first and then wipe down the cluster.
Once you have cleaned or repaired your cluster, installation is reverse of removal.
Hope this helps. Good Luck.