skip to main |
skip to sidebar
Back in February, I started an experiment with an oil additive called Auto-Rx. I was having some lifter noise at start up in my 93 BMW 525i, especially when it was really cold (at least for the California High Desert). Read this post for more information.Here is an update. I just finished the first rinse phase of the experiment. So far I'm pretty impressed with the results.When I started this back in February, I was averaging about 25.5 MPG. As of right now, the last four tanks of gas have averaged me about 27.5 MPG. The motor seems to be running cleaner and I'm not burning/using anywhere near the amount of oil I used to before the first phase of the treatment. I know it's running cleaner because I don't get any soot build up on the tips of my exhaust pipes. Prior to the treatment, I was always wiping soot off the chrome tips, now none. I also used to burn about a quart of oil every 1K miles, last time I added, I had over 2K miles and it didn't even need a whole quart. Another thing is that nearly all of the little oil leaks I had before are gone. I get an occasional little drip, but nothing like it used to be.When I did the first phase oil treatment, I also added the Auto-Rx to my transmission, differential and power steering according to their direction for each. Didn't notice much change to the differential, not saying it didn't benefit from the treatment, just that I didn't notice the difference. As far as the power steering, all of the little leaks in that system have gone away, and it feels a bit tighter in the steering too, that could be the new tires I put on a while back. But the leaks are history and I know that the Auto-Rx is responsible for that.The big change came with the transmission. About 300 miles after adding the product, I was leaving work to go home one morning. I drove out of the parking lot onto the street up a slight incline. As I did so, it didn't feel like normal. Probably 200 yards from the parking lot the transmission downshifted extremely hard, went about another 50 feet and then did it again. I stopped along side of the road thinking I had just blown up the tranny. I got out of the car looked under to see if I could detect any problem, no leaks, so I figured I might as well try to see if it would drive. Much to my surprise, it acted like there was nothing wrong. I drove home, all 40+ miles without incident. After putting on about another 700 miles I changed out the trans fluid and filter per the instructions to get the product out of the system. I drove the car probably another three thousand miles, when I experience the same hard downshifting again, almost exactly in the same spot that it happened the first time. This time, when I got to the stop sign, I just kept going... no problems again. It's now about 2000 miles since the last incident, and it seems to be just fine. Better than fine actually. The tranny shifts much more crisply and doesn't hesitate like it used to. I'm convinced that the Auto-Rx treatment did wonders for that old Transmission. The car has over 200K miles on it, not sure if the trans has that many, but I know it was abused before I bought the car due to the condition of the fluid and filter the first time I changed it after I bought it.So, I'm pretty happy with the results I've had in this car. When I did the treatment on this car, I also added it to my wife's 03 Honda CRV and my daughters 95 525i. The Honda was just starting to leak some oil, but stopped shortly after adding the Auto-Rx. My daughters 525i was averaging about 17MPG, mainly because she drives all short trips, no highway driving. I checked the mileage on it recently, and it is getting almost 19MPG now. I know she hasn't changed the way she drives.Lastly, here are a few pictures I took yesterday of the oil filter housing top and retainer bolt, dip stick and inside of filter housing. I started the second cleaning cycle with this oil change. If you checked out the previous post, it doesn't look like much of the varnish had gone away from the pieces of the housing. I didn't take any pics of the dipstick and bolt the first time, but I can tell you that both of them were the same brown varnish color before the treatment. Now they are back to their natural colors. 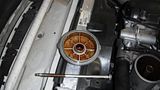
 Anyway, this is all FYI. Feel free to contact me if you have any questions. And, no, I'm not an employee of Auto-Rx. I just feel when you find a good product you should let people know about it.
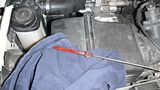
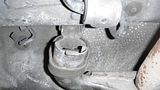
One day before leaving for work, I was cleaning the windows on the 93 525i. I finished up cleaning the rear window and was about to go put my window cleaner and dirty rags away when I noticed some dirt on the chrome tips to the exhaust pipe. I bent down to wipe it off and when I touched the pipes, it moved about two inches to one side. It shouldn't have done that. I got down on one knee and looked up under and found that both of the hangers to the muffler had rotted away. One was completely gone nowhere to be found the other was just about half there hanging from the top mount. I decided that it wouldn't be a good idea to drive it that way.I got in my SUV and drove to work. While there, I looked around to see if I could get the hangers locally. I check AutoZone, they didn't carry them, NAPA had them, but they were special order and cost about $5 each. I looked at autohausaz and they had them for about $2 each. I needed to do a few other things that I'd been putting off, so I went ahead and ordered everything that I was going to need to take care of the projects I wanted to do.For this post, I'm going to focus on the Exhaust Hangers and Rear Trans mounts. I ordered the front mounts too, not knowing if I needed them, but thought I'd rather have them and not need them than vice-versa.As always, the parts came quickly, actually before I could do the work. So after sitting in my garage for several days, I finally got the time to work on the projects I wanted to do.I had known that the rear trans mounts were cracked for almost two years. I didn't have them when I could have used them when I replaced the guibo and the center driveshaft bearing when I first bought the car. I figured if it got real bad, I'd do it later. Since I was possibly going to have to drop the exhaust system out of the car, I thought I might as well do it while the exhaust isn't in the way. A side note, I had been having a weird vibration when starting from a stop. Between 15 and 20 MPH and about 1700-2000rpm, there was this very fast vibration. I thought it had to do with the tires and changed them, but that didn't solve the problem. I then remembered that the rear trans mounts were cracked and that they had probably gotten worse. I also thought that with the exhaust hangers gone, that could possibly be causing the vibration also. So, not having any repair instructions from the Bentley manual for either of these repairs, I just sort of winged it. Here is what I did...I put the car up on jacks as high as they would go. Then I crawled under the car to check on the rear trans mounts. Surprisingly, it appeared that it would be a fairly easy job. I will explain along with pictures I took.This picture shows the cross member that the mounts attach to. The green dots show the bolts that mount to the undercarriage (there are four bolts, one isn't visible on the photo). The red dots show where the mounts attach to the cross member and the transmission.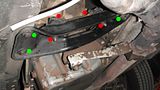 I took my floor jack and supported the transmission under the sump. I just took the weight off of the cross member. I used a piece of wood to distribute the load across the sump instead of having one small spot carry the load. Once that was done, I removed the four bolts holding the cross member. When it was loose, I pulled it off and both the mounts came with it, even though I should have had to remove the nuts that attached them to the cross member.This picture shows one of the old mounts next to one of the new mounts:
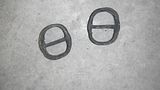
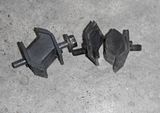 As you can see, the old mount wasn't just cracked, it was torn all the way through. Both of them looked like that. I had to remove the part that attached to the transmission. Once I did, this is what it looked like:
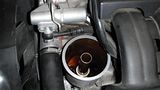
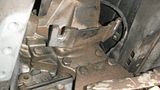
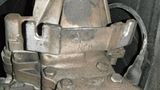 After I got the broken parts off of the transmission, I then installed the new ones on the transmission first. Just make sure you orient them correctly, the mounts are not the same, there is a right and left sided one, also it appears you have to make sure you put the correct side to the transmission and the cross member.I made sure the studs from the mounts went through the cross member and then threaded the mounting bolts to the cross member. I would suggest that you do it however you think would be easier. Couldn't find any torque specs for the bolts, so I snugged them up to about how tight they were to remove them.Now for the Exhaust Hangers...Here are some pictures of the front hangers on and off the car, as you can see they were getting ready to fail also:
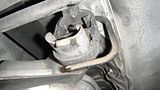
 For some reason, I didn't take any pictures of the new hangers before I installed them. I can't figure how to explain how I replaced to front hangers. You sort of have to thread them on the holders that are attached to the undercarriage and then pull them over the parts on the exhaust system. I found it easier to place my floor jack under the center muffler and jack it up a bit so I didn't have to stretch the hanger so much. I used a couple of screw drivers to help manipulate the hangers too.Here are some pictures of the new ones installed, I figured I took the picture, I might as well show them:
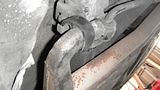
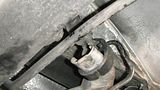 Once the front hangers were in place, I left the floor jack in place and started the rear hangers.These were a bit more difficult. It would have been much easier to do if the exhaust was dropped, and if you have the stock muffler in place you may have to drop the system to replace them. In this car, I have two glass packs in place of the OEM muffler, so there is a bit more room to work around. I also think that the reason these hangers failed after not even two years is because they are exposed to way more heat with the glass packs instead of the OEM muffler.These pictures are of the right and left side hangers installed:
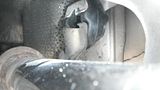
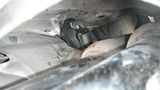 You can see that the holders are two piece. One attached to the car and one attached to the exhaust. I put the hanger on the part attached to the car first and pulled it down into place. I then added the lower holder. It wasn't easy with the little room there. I used a bit of grease so it would slide through the opening easier. I wish I could give you some trick to make this easier, but I don't know one other than dropping the whole system, then you can get to the holders much easier. When I put them on just after I bought the car, the exhaust system was out of the car, so all I had to do was hang both holders and then fish the studs from the holder through the mount on the muffler. Here is a picture from below of both hangers installed:
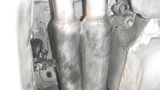 That's it for now, good luck if you're trying to do this.Next up... Water pump, Thermostat and Coolant Replacement.BTW... The vibration I talked about is gone, but I'm not sure if the Trans Mounts or the Exhaust Hangers fixed the problem, Oh Well...


